In This Guide:
Related Guides:
Contracting
eSign Anything®
What is eSign Anything®?
RouteOne’s eSign Anything® allows you to electronically send all deal documents through our secure signing portal to your customer and capture signatures in one signing ceremony, either remotely or in-store, on a tablet device or signature pad.
With eSign Anything®, you can upload PDF or JPG documents into the RouteOne platform and easily apply signature fields as needed.
Other eContracting signing options:
- Signing when eContracting from a Credit Application
- Remote eSigning
- In-Store eSigning
- Troubleshooting Legacy Signature Pads
Defining eSignable Areas
There are two ways you can access the signature tool to define signable areas on uploaded documents:
Through the Deal Jacket
Through the Contract Package page
Accessing the Signature Tool through the Deal Jacket
To create an eSignable form, the document must first be uploaded. One option is to create a signable document by uploading the document from the Documents tab within the Deal Jacket.
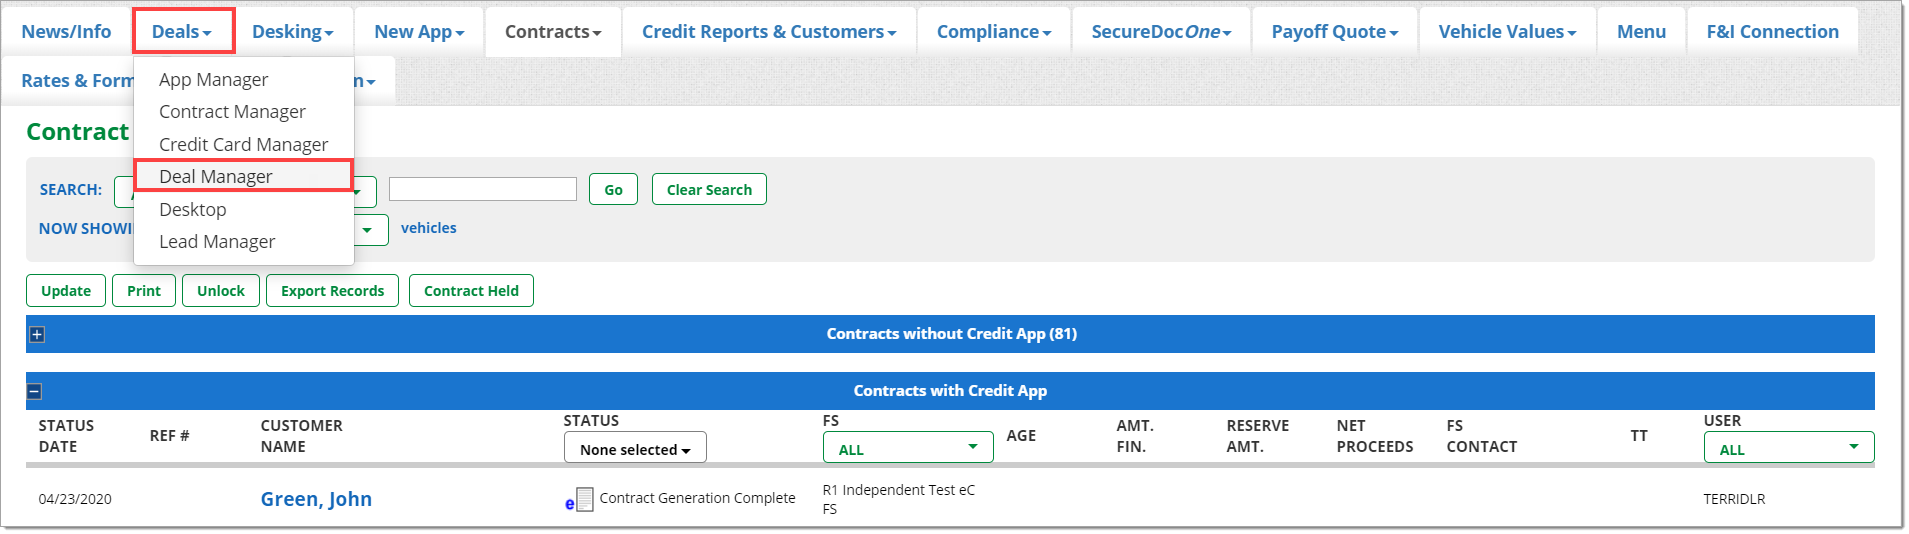
To navigate to the Deal Jacket, begin by hovering over ‘Deals’ from the top navigation, and select ‘Deal Manager.’
On the Deal Manager page, find the deal for which you want to create eSignable documents.
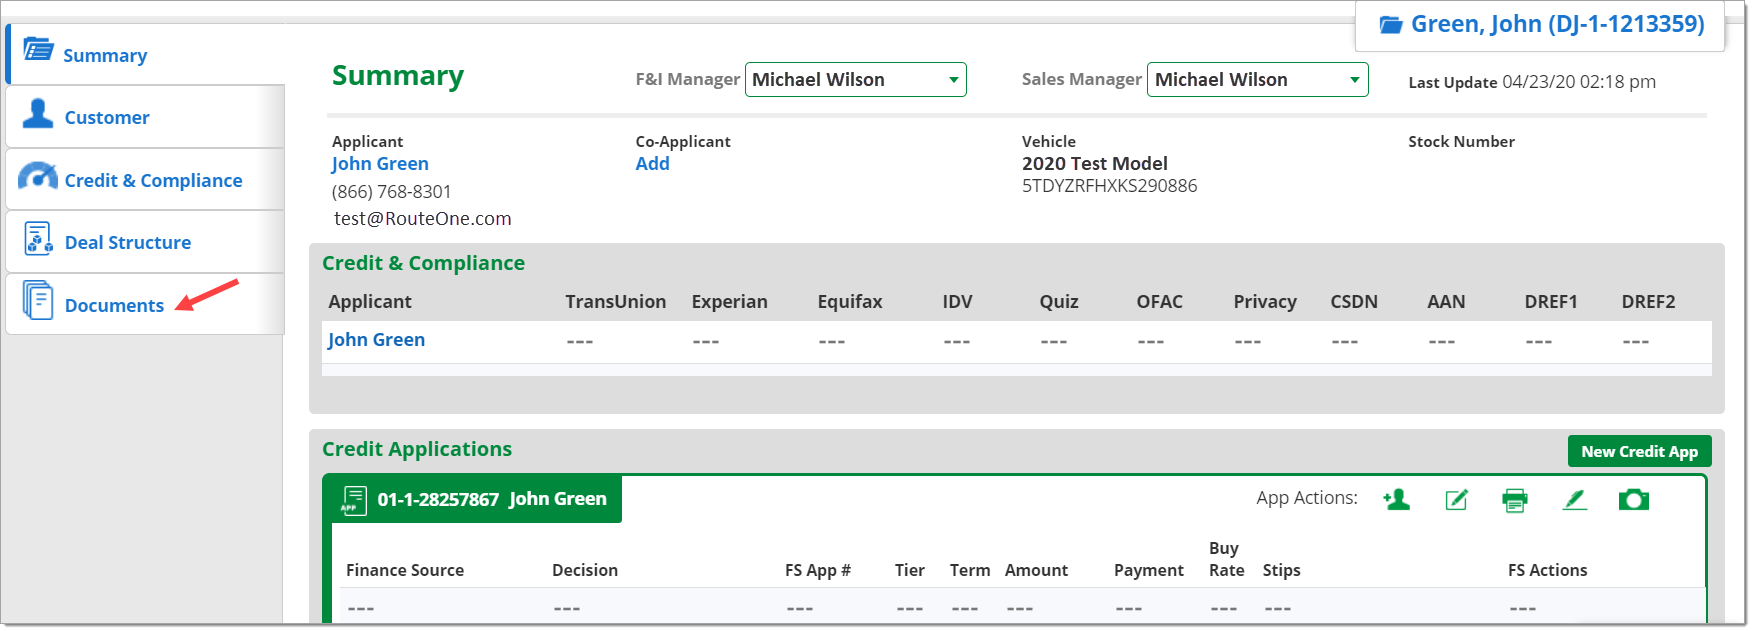
Click the blue Deal Jacket folder to the left of the customer name.

You will be navigated to the Deal Jacket for the customer. Click the ‘Documents’ tab on the left side of the page.
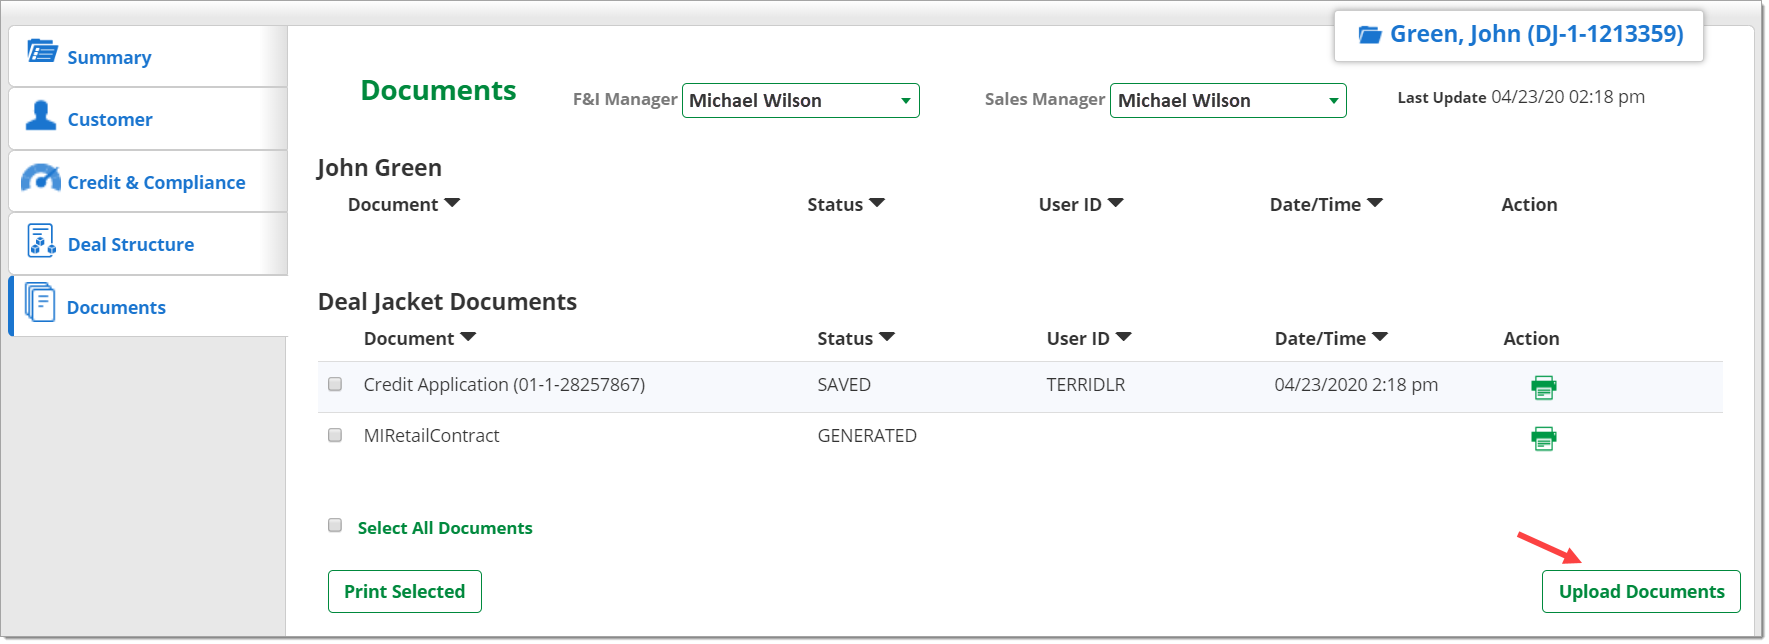
You will be navigated to the Documents page of the Deal Jacket. Click the ‘Upload Documents’ button in the bottom right-hand corner.
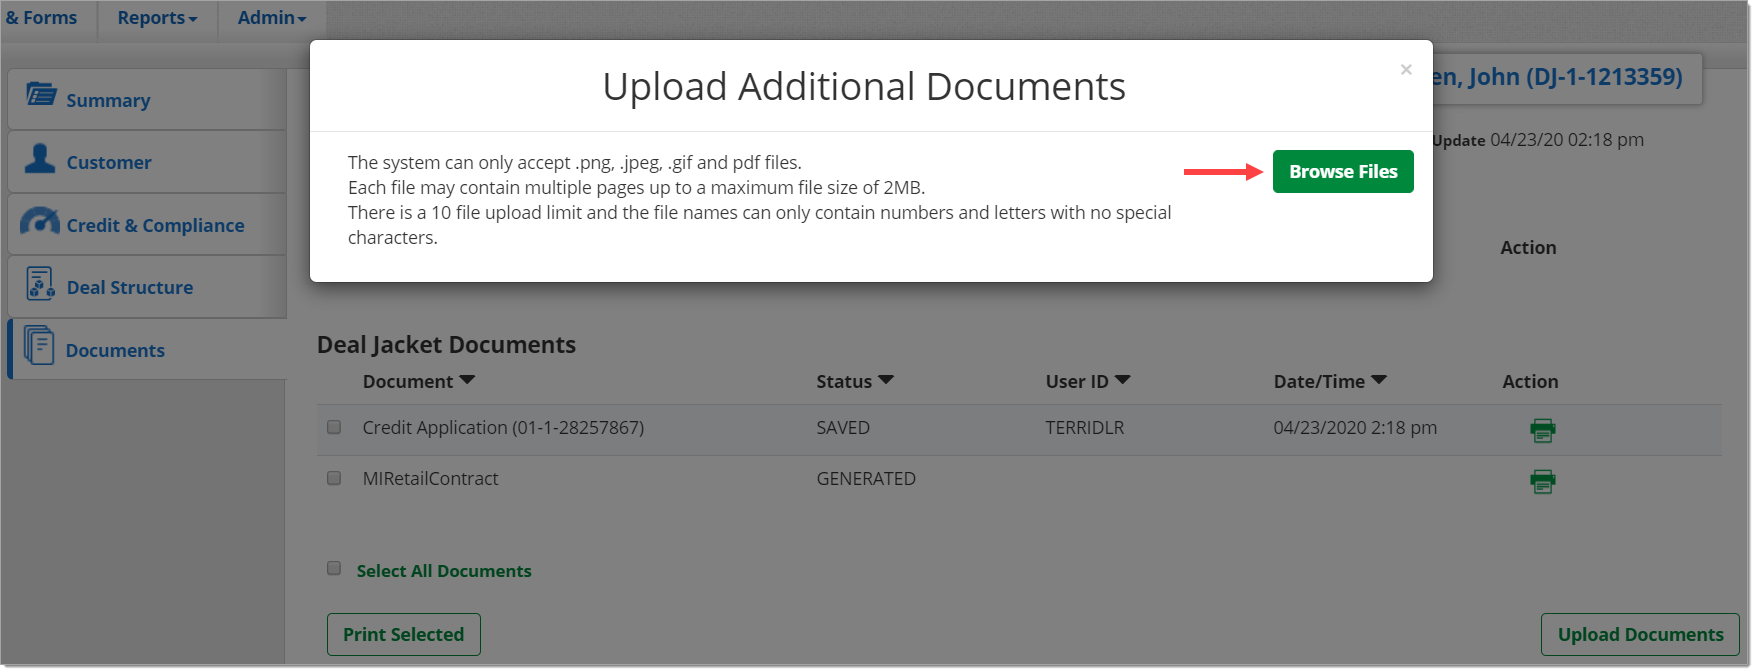
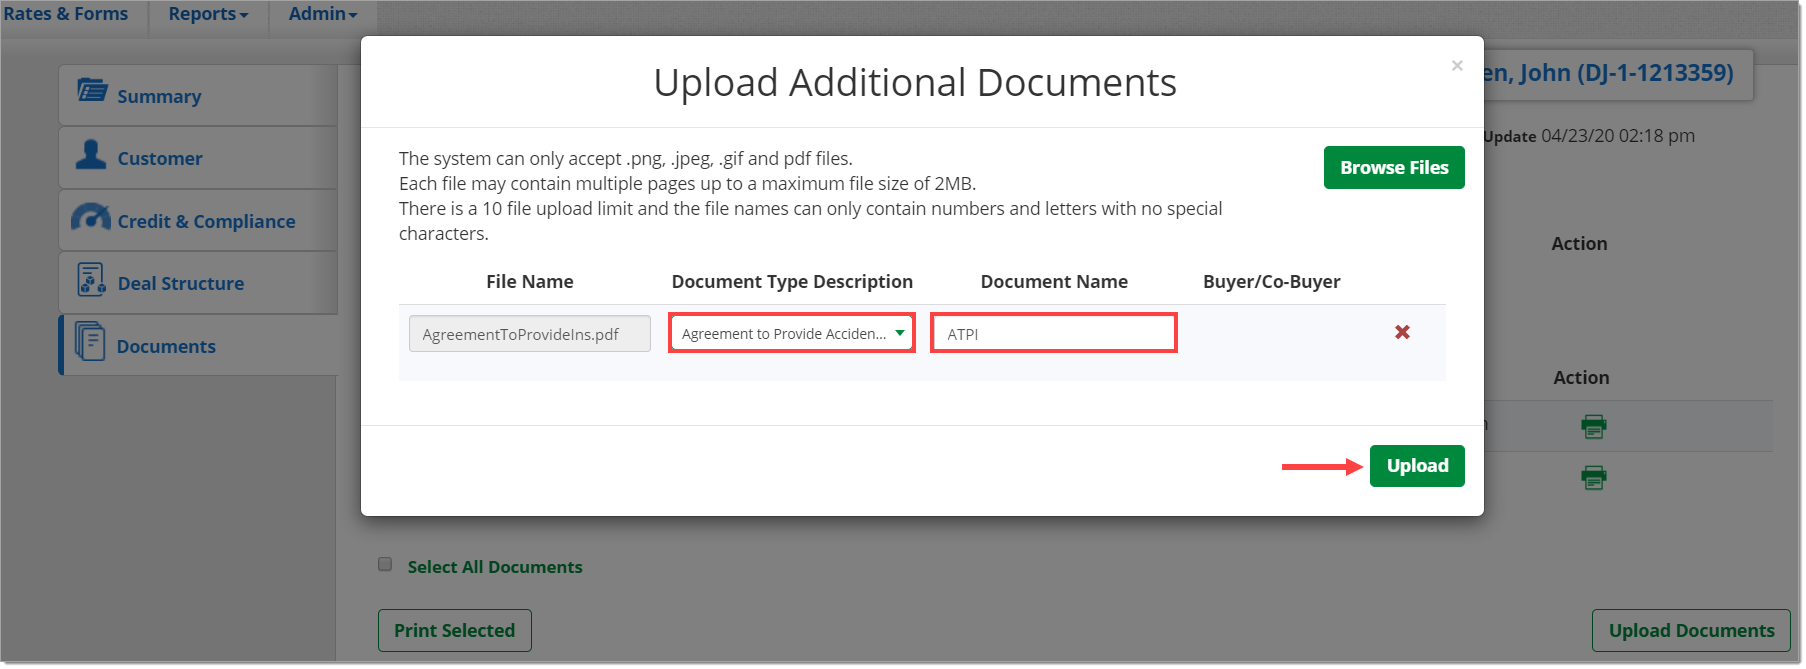
The ‘Upload Additional Documents’ screen will display. Click the ‘Browse Files’ button to browse your computer and select the document you want to upload.
Once you have selected the file you want to upload, the Upload Additional Documents screen will display the name of the file that you are about to upload. Some finance sources have enabled automatic document typing/classification. Click here for more information about ‘Automatic Document Typing/Classification in eContracting.’
In the dropdown menu, select the ‘Document Type Description.’
In the ‘Document Name’ field, enter the name that you want to be displayed for the document.
You cannot include spaces or special characters.
Click the ‘Upload’ button.
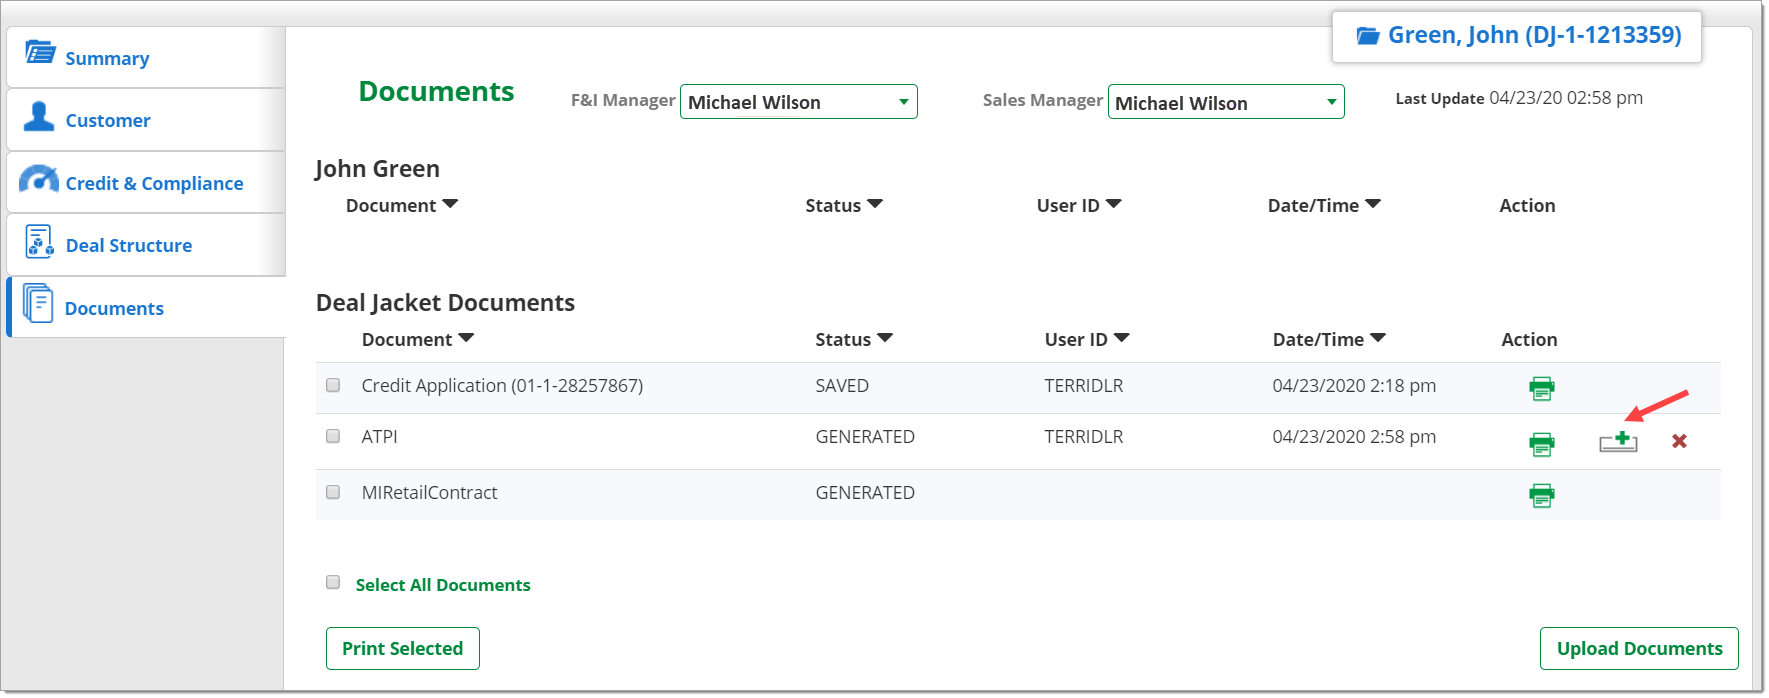
Your uploaded document will be displayed in the ‘Deal Jacket Documents’ list.
To the right of the uploaded document, you will see an icon which indicates that signature fields may be created and defined for the document.
Click the icon to open the signature tool.
Proceed with defining your signature fields as described in the ‘Creating Signature Fields’ section below.
Accessing the Signature Tool through the Contract Package Page
To create an eSignable form, the document must first be uploaded. One option is to create a signable document by uploading the document from the Contract Package page.
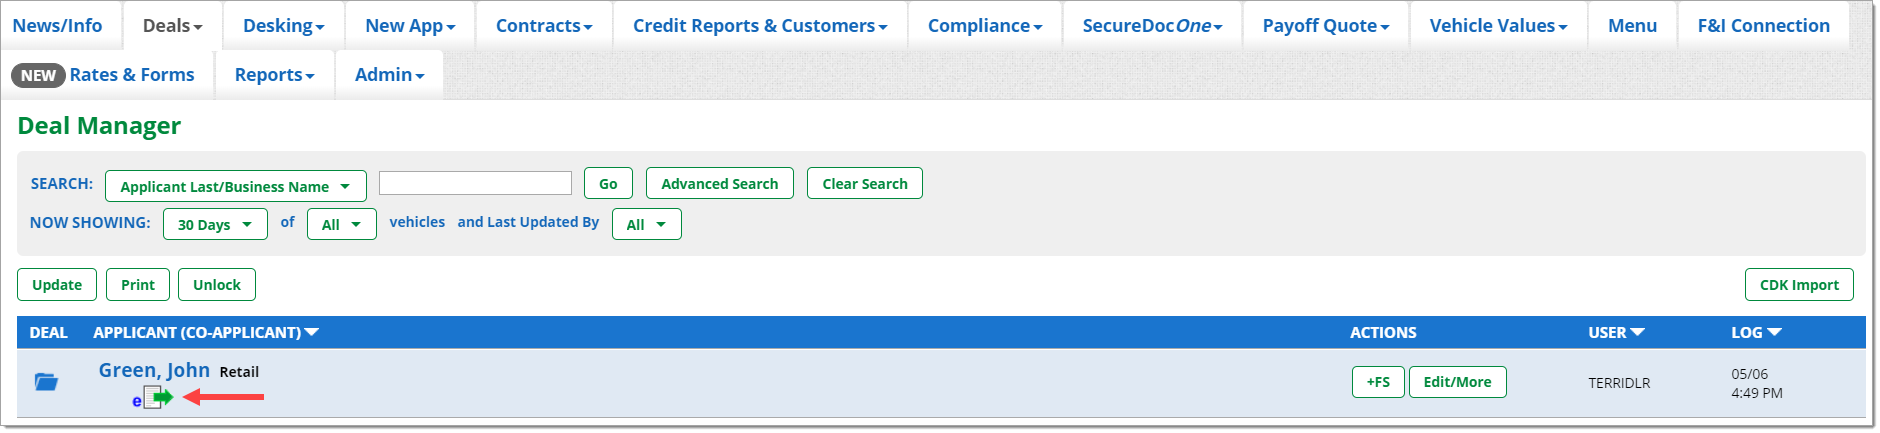
To navigate to the Contract Package page, begin by hovering over ‘Deals’ from the top navigation, and select ‘Deal Manager.

On the Deal Manager page, find the deal for which you want to create eSignable documents.
Click the contract icon below the customer’s name.
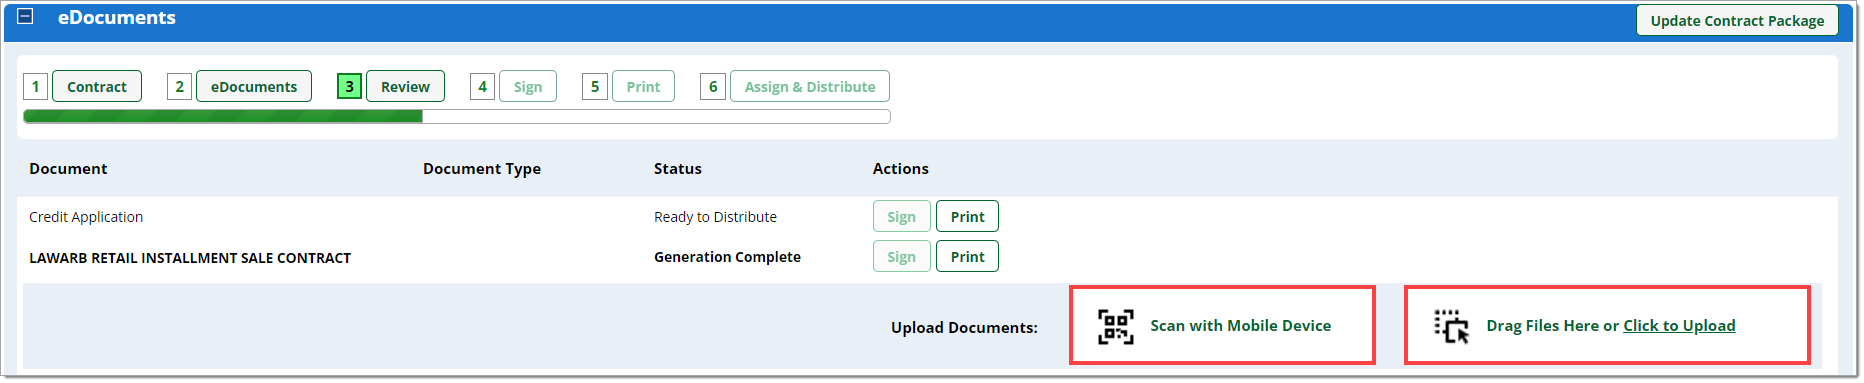
You will be navigated to the Contract Package for the customer.
Scroll to the ‘eDocuments’ section and upload documents using one of the following methods:
- Drag and Drop files from your PC to the eDocuments section.
- Click the ‘Click Here to Upload’ link to browse for files on your PC.
- Click the ‘Scan Mobile Documents’ button to use Mobile Document Capture.
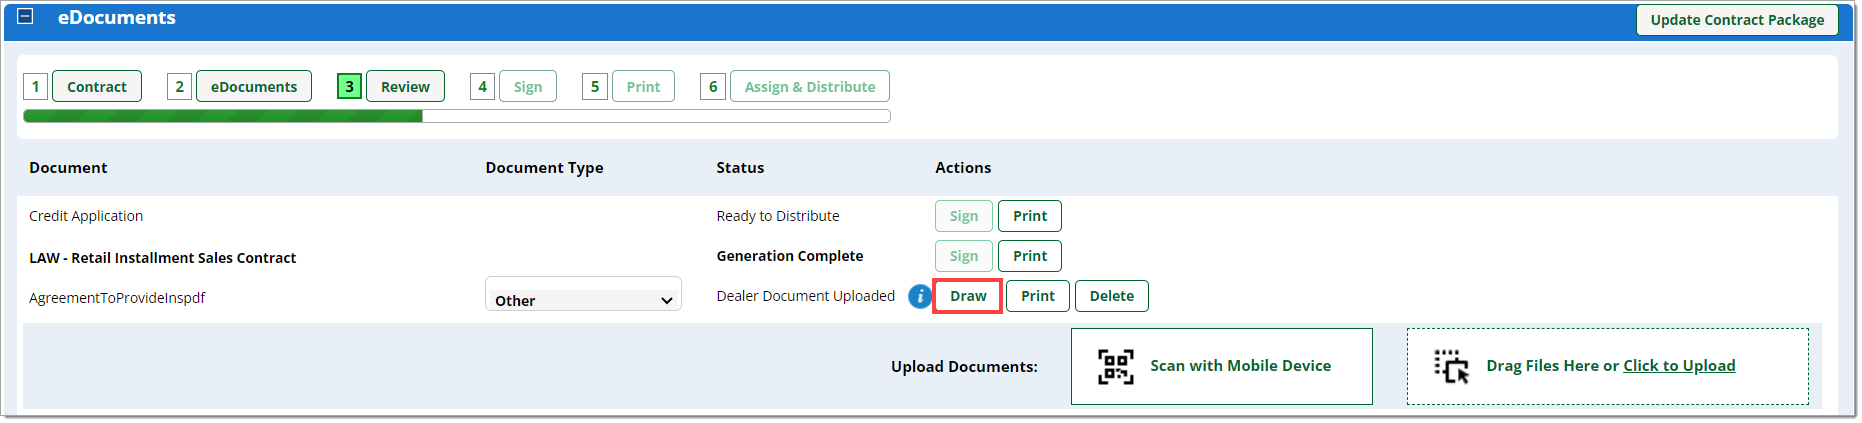
Once you have selected the document(s) you would like to upload, each document will be listed in a separate row on the Contract Package page.
For each document, select the ‘Document Type’ in the dropdown menu.
A ‘Draw’ button is displayed next to the document, indicating that signature fields can be defined for the document.
Click the ‘Draw’ button to open the signature tool.
Proceed with defining your signature fields as described in the ‘Creating Signature Fields’ section below.
Creating Signature Fields
Once in the ‘Draw’ page, you can create a full signature field, initial field, or date field.
To begin, click and drag anywhere on the document to create a box for a field, or select one of your saved Signature Templates from the ‘Select Signature Template’ dropdown.

Please note the following when creating fields:
To edit field information, click on the field and edit the ‘field type,’ ‘signer,’ and ‘prompt text.’ You can also designate each field as ‘required’ or ‘optional’ by checking or unchecking the ‘Required’ box. You do not need to edit the sequence field. The RouteOne system will auto-sequence the fields for you.
To delete a field, click on the box to highlight it, then press the ‘Delete’ key on your keyboard.
Fields can only be edited or deleted before saving the document. Saving the document occurs when you click the ‘Apply Signature Boxes’ button.
Once the document is saved, if you need to edit or delete fields, you will need to delete the document, re-upload it, and redefine the fields. Editing or deleting fields after the document has been saved is not available at this time.
‘Signer’ types include Buyer, Co-buyer, Salesperson, or Dealer. Additional ‘Signer’ types not listed in the dropdown menu (e.g., spouse, guarantor, representative, etc.) will be mapped automatically to either a buyer or a co-buyer.
A Spouse or a Guarantor should be created with a Signer selection of ‘Co-buyer.’
The ‘Salesperson’ Signer type is only supported in Canada. US dealers should not use this Signer type.
You must first create a signature field before you can create a date field. This is because a date field must be associated with a signature field.
- Note that although you will create a date field for a given signature field, the customer will not complete the date fields.
- The date field will be populated automatically by the RouteOne system with the date that the document is signed.
The ‘Signature Sequence’ indicates the order that the field will be completed by the ‘Signer.’ RouteOne will auto-sequence the fields for you. You do not need to modify them. However, if you would like to enter sequencing on your own, you can follow the tips below.
- Sequencing ensures the signing process for each signer is sequential and easy to follow.
- For example, if the ‘Signer’ for the field is the Buyer, a ‘Signature Sequence’ of 1 will mean that field is the first field signed by the Buyer. A ‘Signature Sequence’ of 2 will mean that field is the second field signed by the Buyer.
- If there are multiple signature fields for the same signer on a document, create the signing order sequentially for each signer, starting at the top of the document and working your way down.
- For example, the first Buyer signature field would be Buyer 1. The first Co-Buyer signature field on the page would be Co-Buyer 1.
Note that a ‘Signature Sequence’ cannot be repeated for the same type of ‘Signer,’ as the signer would not know which field to sign first.
- For example, if the ‘Signer’ for the field is the Buyer, there can only be one signature field with a ‘Signer’ type of Buyer and a ‘Signature Sequence’ of 1 in that particular document.
By default, fields are considered required. To make a field optional, uncheck the ‘Required’ box.
- If you have a document with required fields and you also create optional fields, the signer will be able to skip past the optional fields with no additional prompts.
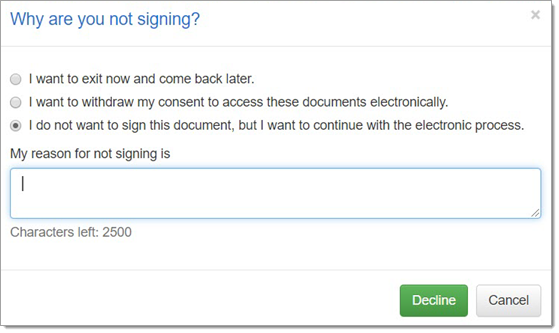
If you have a document with only one field and that field is optional, the signer can skip past it; however, the signer will be asked why they are skipping signature on that page:

The ‘Signature Prompt Text’ will be displayed to the user during the signing process to explain the field that is being signed. This text defaults to ‘Please see review copy before signing.’ You can modify this text as needed.
- For example, ‘You are signing for Agreement to Provide Insurance.’
This text is not displayed to signers using Remote eSigning or the tablet signing process. This text is only displayed to signers who are using a signature pad or signing via a mouse in eContracting.
Note that it will always be the dealer’s responsibility to ensure that any documents requiring ‘wet ink’ signatures are also collected.
Certain documents may require physical signature(s) (e.g., Odometer Disclosure Statements in certain states). Please consult with your dealership’s compliance counsel to ensure compliance with applicable federal, state, and local laws and regulations.
Once you have finished creating a signature field, you can click anywhere on the PDF to create another signature field. When you are finished creating signature fields or have applied a Signature Template, click the ‘Apply Signature Boxes’ button on the left side of the screen.

If you had previously opened the signature tool from the Contract Package page, clicking the ‘Apply Signature Boxes’ button will navigate you directly back to the Contract Package page.
However, if you had previously opened the signature tool from the Deal Jacket, clicking the ‘Apply Signature Boxes’ button will navigate you back to the Deal Jacket ‘Documents’ page.
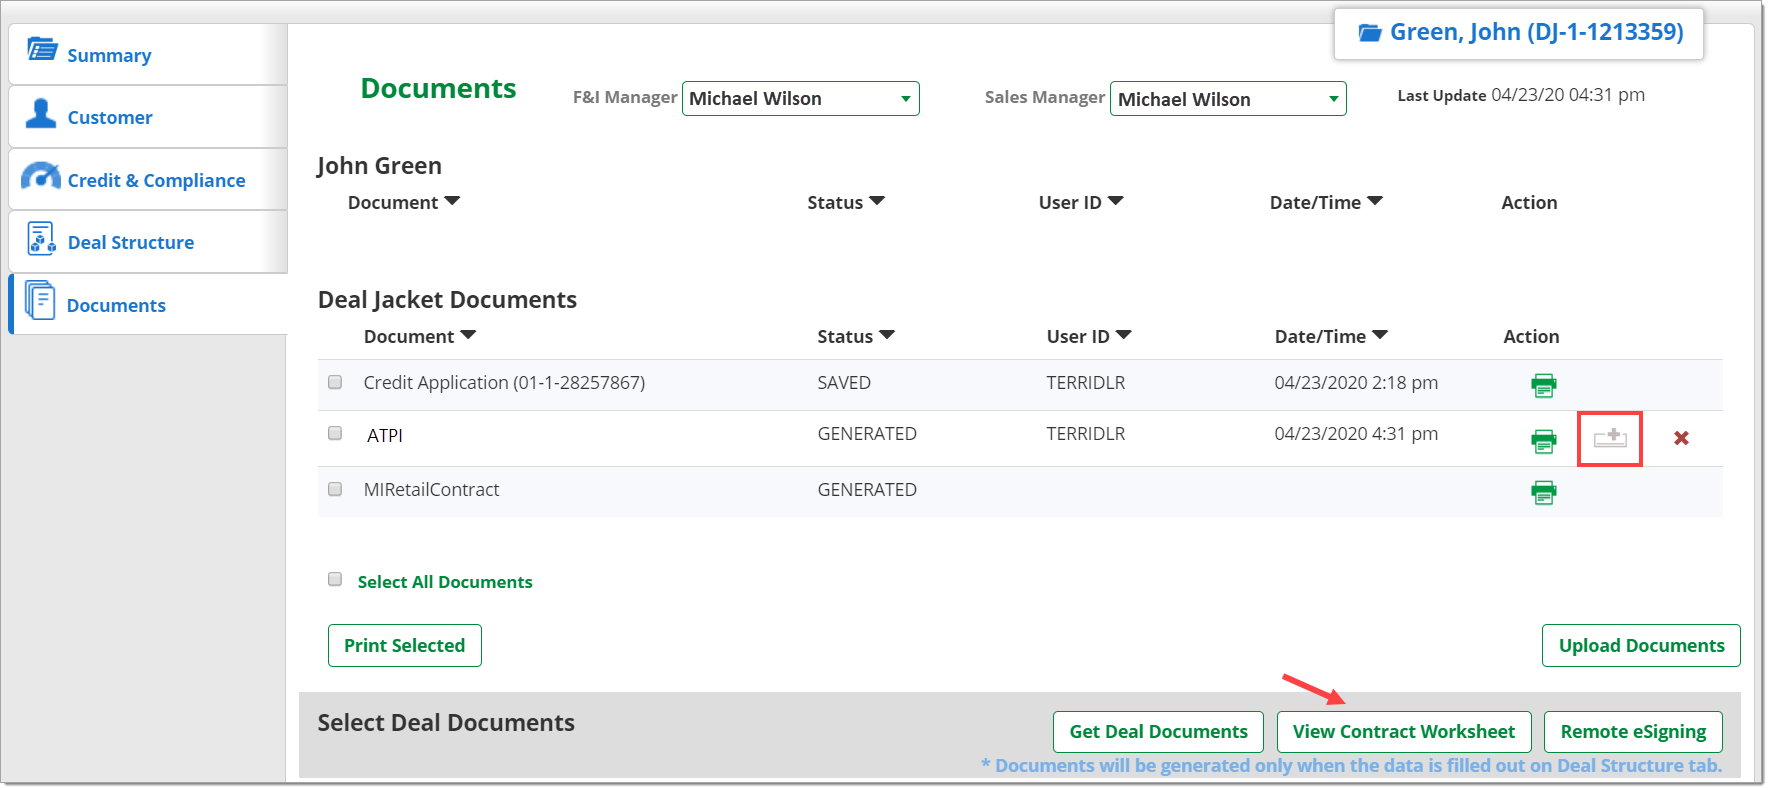
- In the ‘Documents’ page of the Deal Jacket, you will see that the signature icon to the right of the uploaded document is now greyed out. This is an indicator that the signature fields have been created for the document.
Click the ‘View Contract Worksheet’ button to navigate to the Contract Package page and complete the signing process.
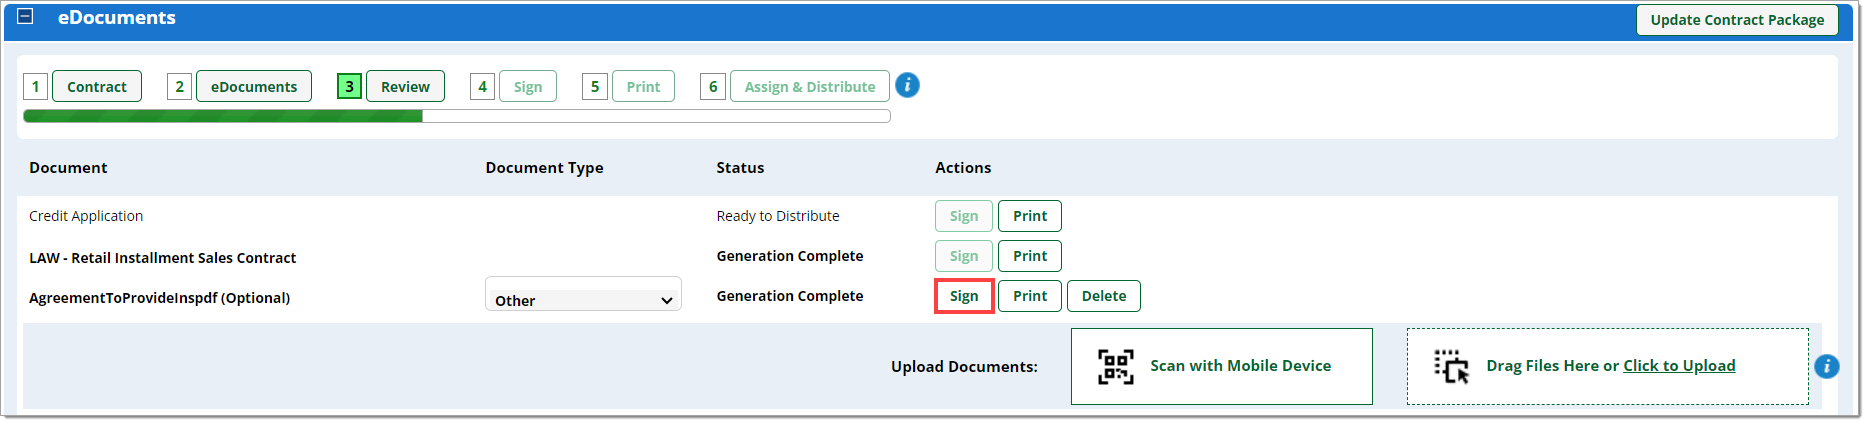
- Once you have returned to the Contract Package page, you will see your uploaded document(s) displayed as part of the contract package.
- A ‘Sign’ button will have replaced the ‘Draw’ button next to your uploaded document(s).
- Proceed with the signing process.
- Your signable documents will be included in your preferred RouteOne signing process, whether that is via a tablet, signature pad, or RouteOne Remote eSigning (Premium Service).
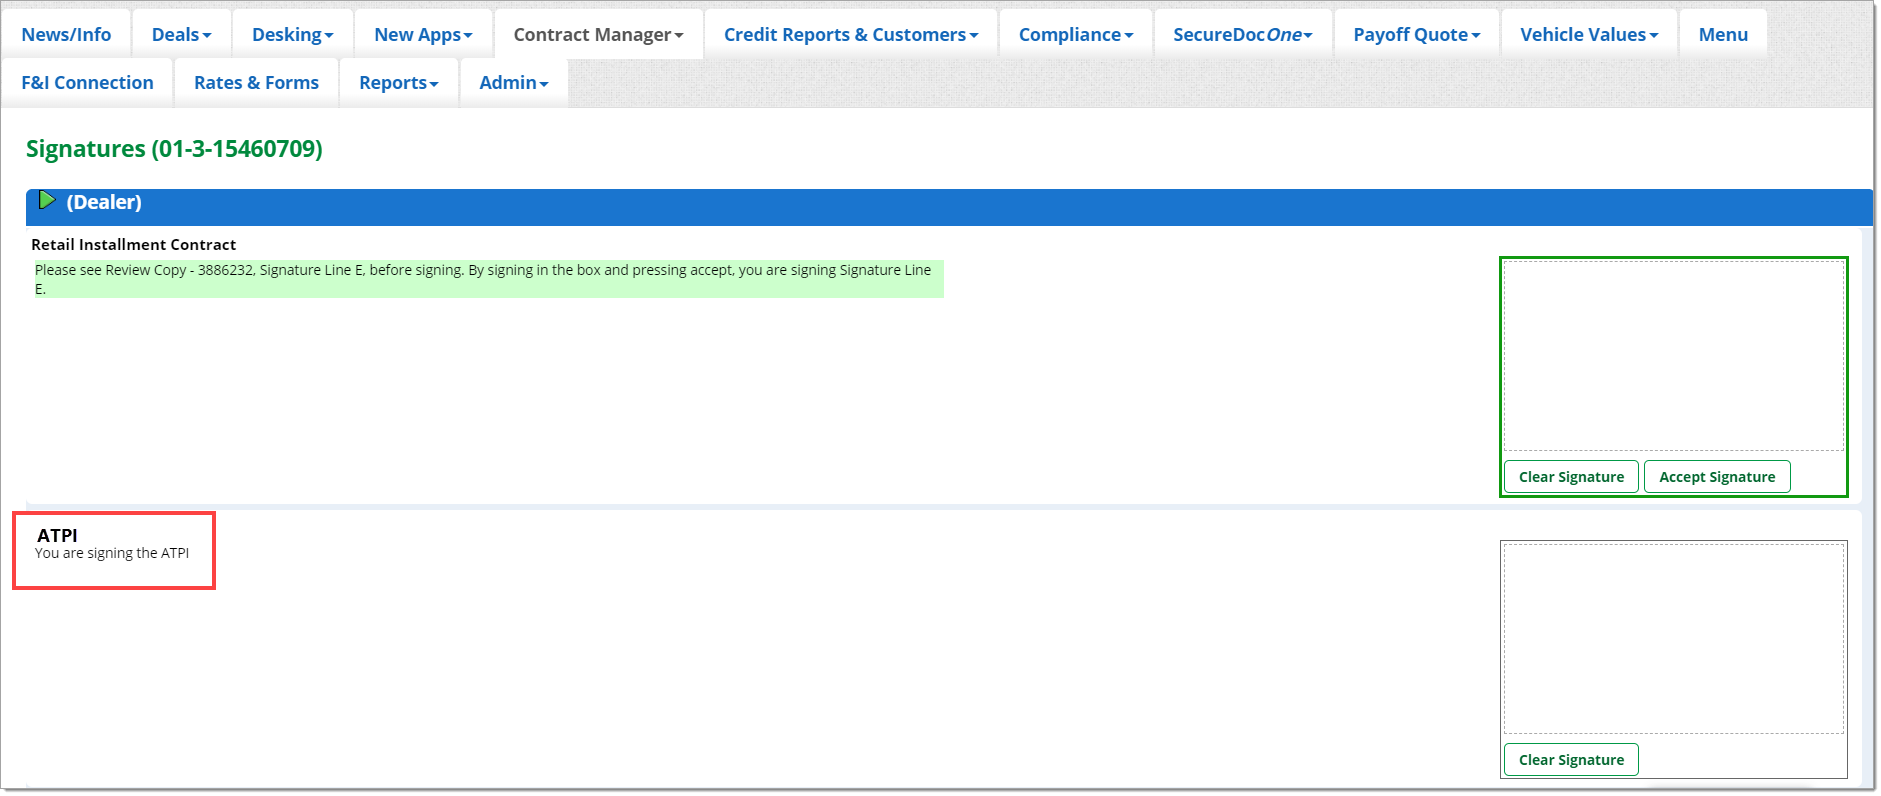
Signing Example: Remote eSigning
For this example we will continue with Remote eSigning. Click the ‘Remote eSigning’ button on the Contract Package page.

Once you click the ‘Remote eSigning’ button, you will begin the RouteOne Remote eSigning workflow.
The signature field(s) that you defined on the uploaded document will be signable for your customer. Once all signatures are captured, be sure to review all contract documents and ensure signatures are properly applied before proceeding to the next step of eContracting.
More information on RouteOne Remote eSigning

Signing Example: Non-Remote eSigning Sessions
For non-Remote eSigning sessions, the ‘Signature Prompt Text’ field appears within the RouteOne eContracting signing process. Once all signatures are captured, be sure to review all contract documents and ensure signatures are properly applied before proceeding to the next step of eContracting.
more information on ‘eContracting from a Credit Application
Once all signatures are captured, be sure to review all contract documents and ensure signatures are properly applied before proceeding to the next step of eContracting.
Signature Templates
Signature templates can save time by allowing you to designate a signature template for your uploaded documents, which allows you to skip the steps for creating signature fields each time the document is used.
Your saved Signature Templates can be found in the Signature Templates page, and will be available to all eContracting users at your dealership.
Accessing the Signature Templates page
You must have eContracting permissions to access the Signature Templates page.
To access the Signature Templates page, hover over the ‘Contracts’ tab, then select ‘Signature Templates’ from the dropdown menu.

Creating Templates
After selecting ‘Signature Templates’ from the ‘Contracts’ tab dropdown menu, the ‘Signature Templates’ page will load.
To create a new template, click the ‘Add Template’ button.
To delete a previously created template, click the ‘X’ next to the corresponding template.

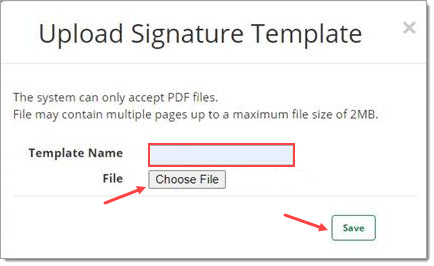
An ‘Upload Signature Template’ screen will display. Click the ‘Choose File’ button to select a document to upload from your PC.
Enter the template name. This will be the name displayed in the ‘select’ list when uploading documents in the eContracting process, which will allow you to apply the signature template to a document.
Click the ‘Save’ button.
When you have finished creating your signature fields, click the ‘Apply Signature Boxes’ button.
For more information, refer to the ‘Creating Signature Fields’ section in this guide.
You will be directed back to the signature template page, where your newly added signature template is listed.

Additional Signature Template Creation Information
Editing templates is not supported at this time. If you need to revise a template, delete it and recreate it with the desired fields.
If you exit out of the process after clicking the ‘Save’ button on the document upload screen, your template will be listed in the Signature Templates page, and the edit icon will be enabled. This indicates signature fields have not yet been created for that document.
When defining signature fields, be sure to create all fields for any potential signer. For example, if a form has fields for a co-buyer, be sure to define those fields. The system will automatically prompt only for signatures that are applicable to the deal when the signing ceremony is being performed.
You can apply Signature Templates directly from the ‘Draw’ page when accessing it from the Contract Package page.
Using Signature Templates
A selectable ‘Signature Template’ dropdown list is displayed on the ‘Draw’ screen when accessing it from the Contract Package page.
If you apply a Signature Template to your document from the draw page, you will not be able to edit any of the existing signature boxes or add new signature boxes. If you want to make changes once you apply a Signature Template, you’ll need to click the ‘Clear’ button and add each signature box manually. See the 'Creating Signature Fields' section of this guide for more information about manually adding signature boxes.
After uploading a document, if you wish to apply a signature template to that document, select from the available templates in the drop-down list.

The signature fields created for that template in the Signature Templates page will automatically be added to your uploaded document so that you will not have to manually define them again. Click the ‘Apply Signature Boxes’ button to apply them to the document.

If you do not choose a signature template, you still have the option to manually draw the signature fields on your uploaded document.
For more information, refer to the ‘Creating Signature Fields’ section in this guide.
FAQs
This feature is available to all eContracting dealers.
The dealer can create a full signature field, initial field, or a date field.
Only the signature and initial fields are signed by the customer(s).
Date fields do not display as signable areas on the document. The date field is automatically populated by the RouteOne System when the document is eSigned.
If you have not yet clicked the 'Apply Signature Boxes' button, you can edit your field by clicking on it and modifying the settings in the toolbox.
If you have already saved your document with signature boxes, you will have to delete the document, reupload it, and redefine the fields. Editing fields after the document has been saved is not available at this time.
RouteOne does not send non-signable documents for viewing in the signing room, though all documents that are part of the package are included as part of the final package that the customer receives.
If you want to include non-signable documents for the customer to view while going through the signing process, the current solution is to create an ‘initial’ field on each document. This will include the document in the signing room.
Currently the file size for defining signature fields is limited to 2 MB per file, and a total of 23 pages.
Please note that this file size limit only affects the ability to define signature fields; it does not affect the accepted file size or contract package size in eContracting.
See the file size information in the FAQ above. If you upload a file in eContracting that is over 2MB, or a total of 23 pages, you will receive a popup error when you click on the ‘Draw’ button.
This will not impact Remote eSigning or existing eContracting functionality. You can still initiate Remote eSigning and upload documents to eContracting.
However, documents over 2MB cannot have signature fields created. This means that those documents would not be included in the Remote eSigning ceremony or the tablet signing process.
If you receive the error: ‘ATTENTION – ACTION REQUIRED TO CONTINUE
We have detected a PDF rotation setting on your uploaded document. This setting can be present even if the document does not appear to be rotated and may cause signatures to be applied incorrectly (including potentially applying the signature to an unintended location). To help ensure there are no issues applying signatures to your uploaded document, please follow these instructions and re-upload your document to continue.’
Take the following steps to resolve:
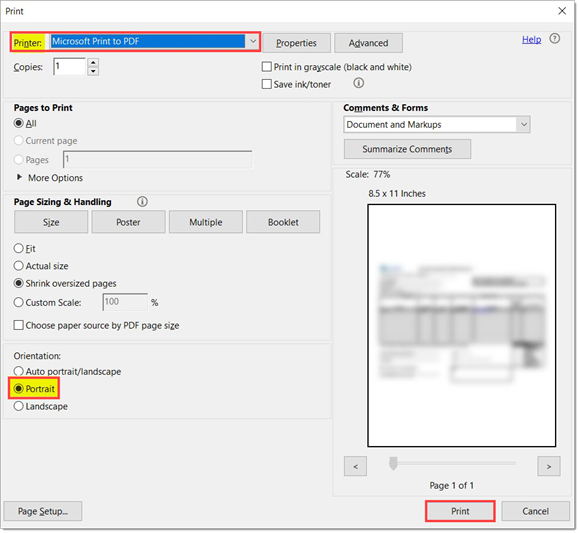
- Open the PDF.
- Choose ‘File’–► ‘Print’ (or ‘Ctrl+P’).
- From the ‘Printer’ dropdown menu, select ‘Microsoft Print to PDF.’
- In ‘Orientation,’ select ‘Portrait.’
- Click ‘Print.’
- Save the PDF to a local folder.
- Upload the saved PDF and draw signatures in RouteOne.
If you uploaded the documents from the Contract Package workflow, through ‘Mobile Document Capture’ or ‘Upload From Your PC,’ by default they will be checked on the ‘Assign & Distribute’ step to be included in the distribution package.
If you uploaded the documents through the Deal Jacket workflow, by default they will not be checked on the ‘Assign & Distribute’ step.
In the ‘Assign & Distribute’ step, you can check/uncheck documents to be distributed as needed.
ROUTEONE SUPPORT
Contact
Phone: 866.768.8301
Email: r1support@routeone.com
Hours (EST)
Monday - Friday: 6:00am – Midnight
Saturday: 9am – 9pm
Can’t find what you need?
Try our search
