In This Guide:
Related Guides:
Contracting
In-Store eSigning
Collecting Signatures In-Store
Before you can collect signatures, your Dealer System Administrator (DSA) must assign you the ‘General Contracting’ permissions (to view contract packages and documents) and the ‘Sign Contract’ permissions (to view contract packages and sign documents) for the RouteOne system.
For more information about System Requirements for collecting signatures, click here.
Important: The following steps are specific to the signing portion of the eContracting process. Please note that the rest of the eContracting process must be completed in the RouteOne system.
There are several ways you can collect signatures in-store:
Via your desktop
No tablet or additional device required. Simply visit https://www.routeone.net/esign and complete the signing process.
Via an Android® or other tablet device
With an Android® or other tablet device, visit https://www.routeone.net/esign and complete the signing process.
RouteOne cannot guarantee fully supported functionality on all tablet devices.
Via an iPad®
With your iPad®, download the Mobile eContracting Application from the Apple App Store®.
RouteOne’s eContracting application is only available on Apple iPads and is not available on iPhones or Android devices.
Use your RouteOne User ID and Password to log into the application and complete the signing process according to the steps in the sections below.
- The only permissions required are the ‘General Contracting’ and ‘Sign Contract’ RouteOne system permissions listed above.
- After downloading and/or updating the application, multi-factor authentication will require you to register your device. You will then be required to answer one of your challenge questions, and retrieve a token code from your email address.
- Updates to the application can be accessed by downloading the most recent version in the Apple App Store.
You can also navigate to the RouteOne eContracting application directly from RouteOne’s Contract Package Page by scanning a QR code on the Contract Package Page. Click here to learn more about using the QR code functionality.
In-Store eSgining from an iPad®
Using iCloud Keychain
Viewing a Contract Package
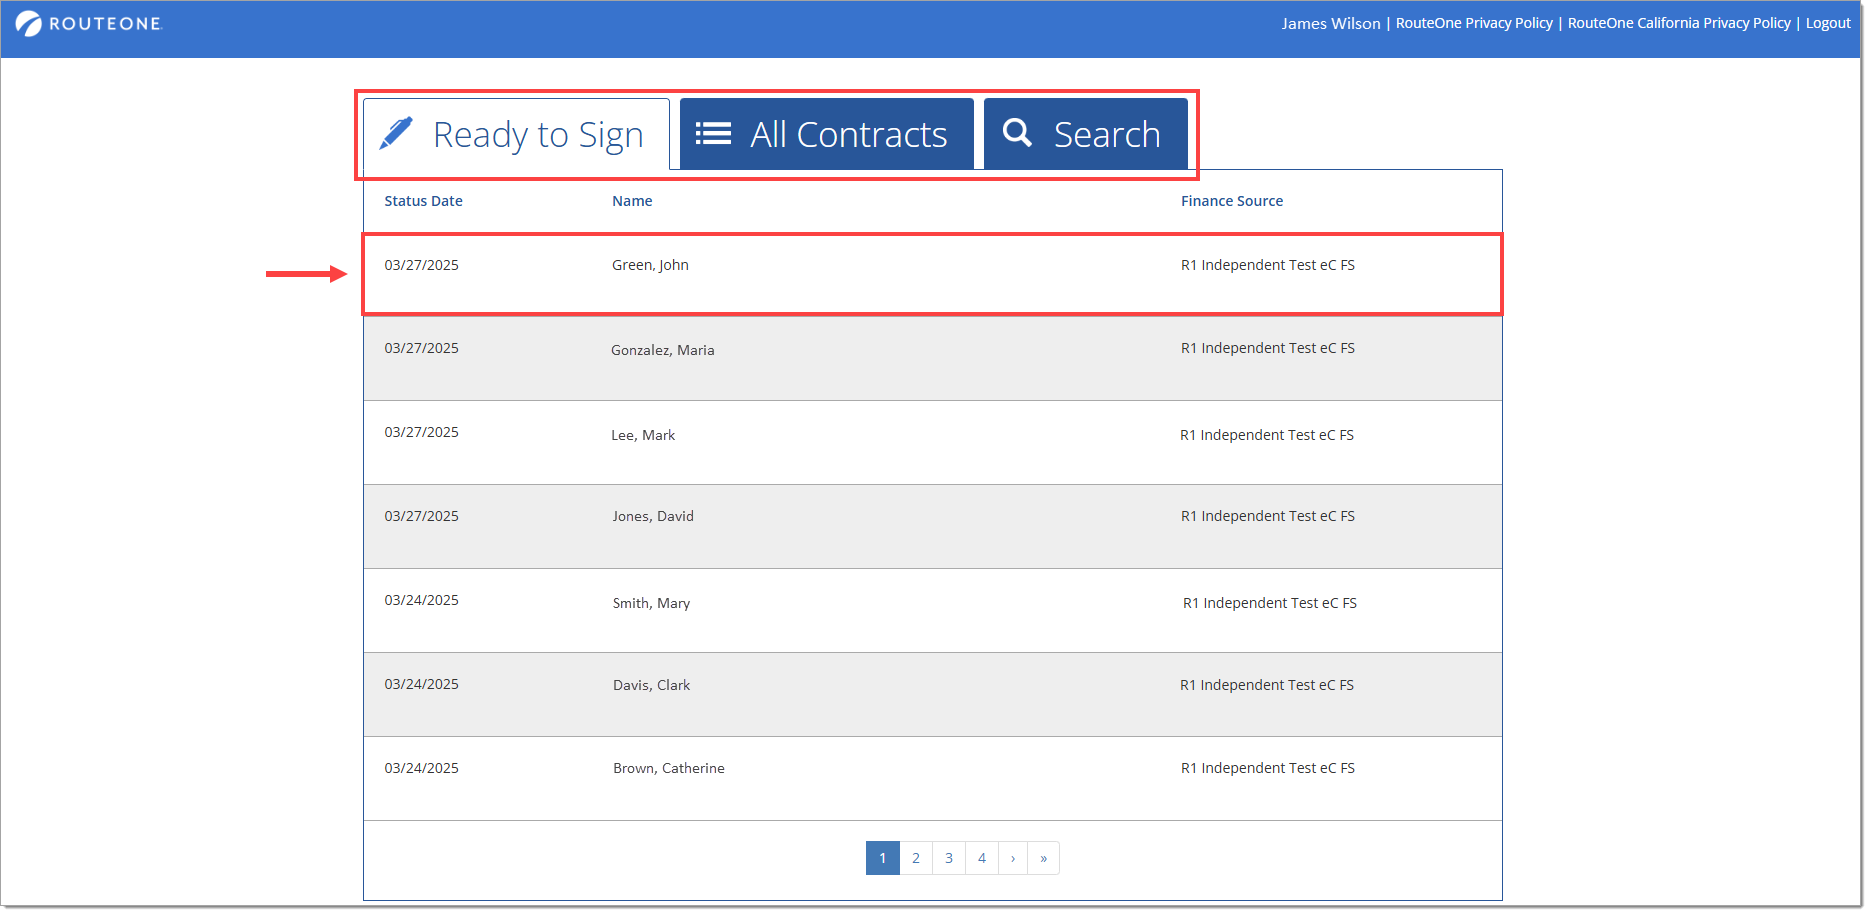
To view a contract, navigate to the eSign page.
Contracts where the ‘Customer Review Copy’ has been printed but not signed will appear under the ‘Ready to Sign’ tab.
All contracts where the ‘Customer Review Copy’ has been printed, even if they have already been signed, will appear under the ‘All Contracts’ tab.
To quickly locate any contract, use the ‘Search’ tab.
To view a contract package and to capture signatures, find the desired contract package using one of the three navigation options at the top of the page, then click anywhere on the corresponding row to navigate to the contract package.
The Contract Package Page
Clicking a row will direct you to a screen where you can view documents and collect signatures for the selected contract package.
A list of all documents in the contract package is displayed in the ‘Document’ section.
To view any of the documents in the list, click the ‘View’ button next to the particular document of interest to launch a PDF version of the document. See more information about the actions you can take with selected documents by visiting the ‘Viewing and Printing Document’ section of this guide.
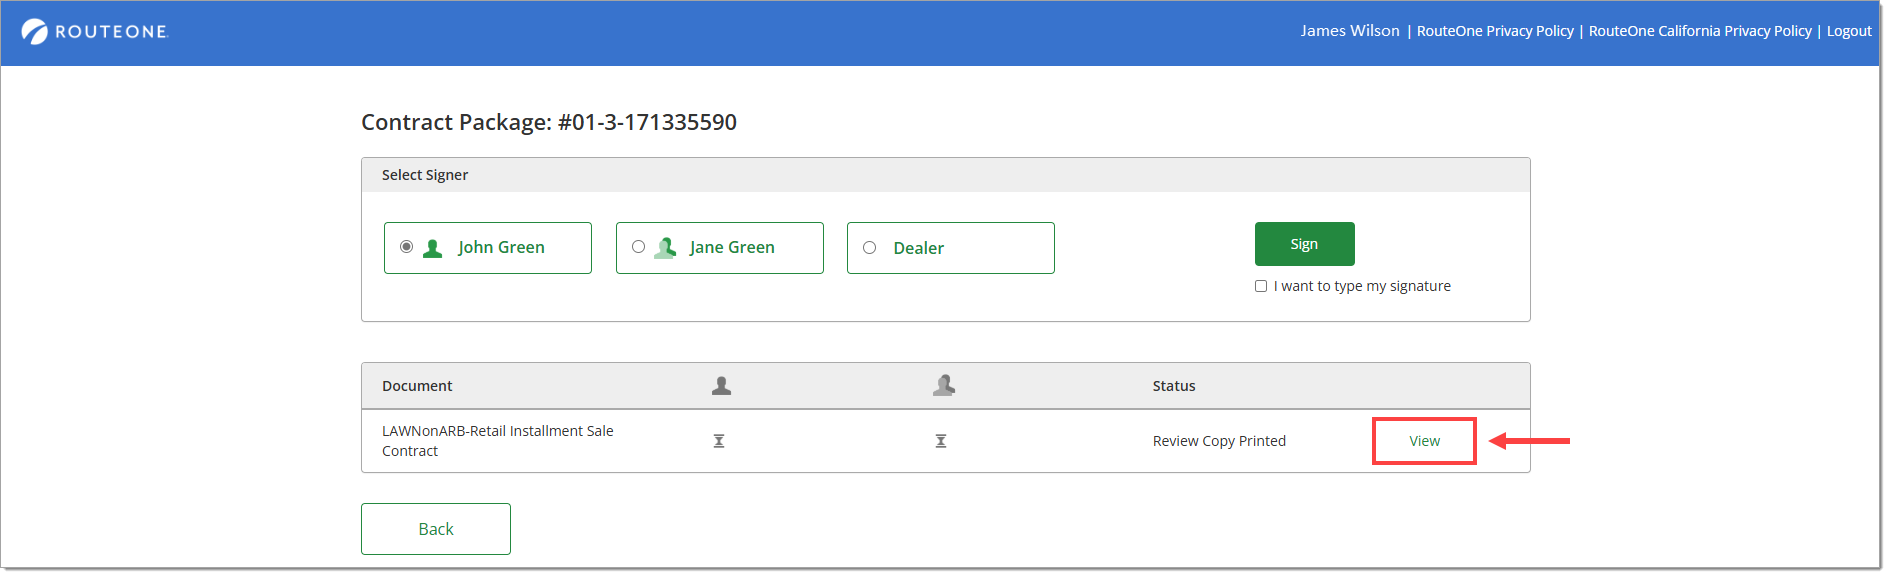
The RouteOne contract number is displayed at the top of the page for reference.
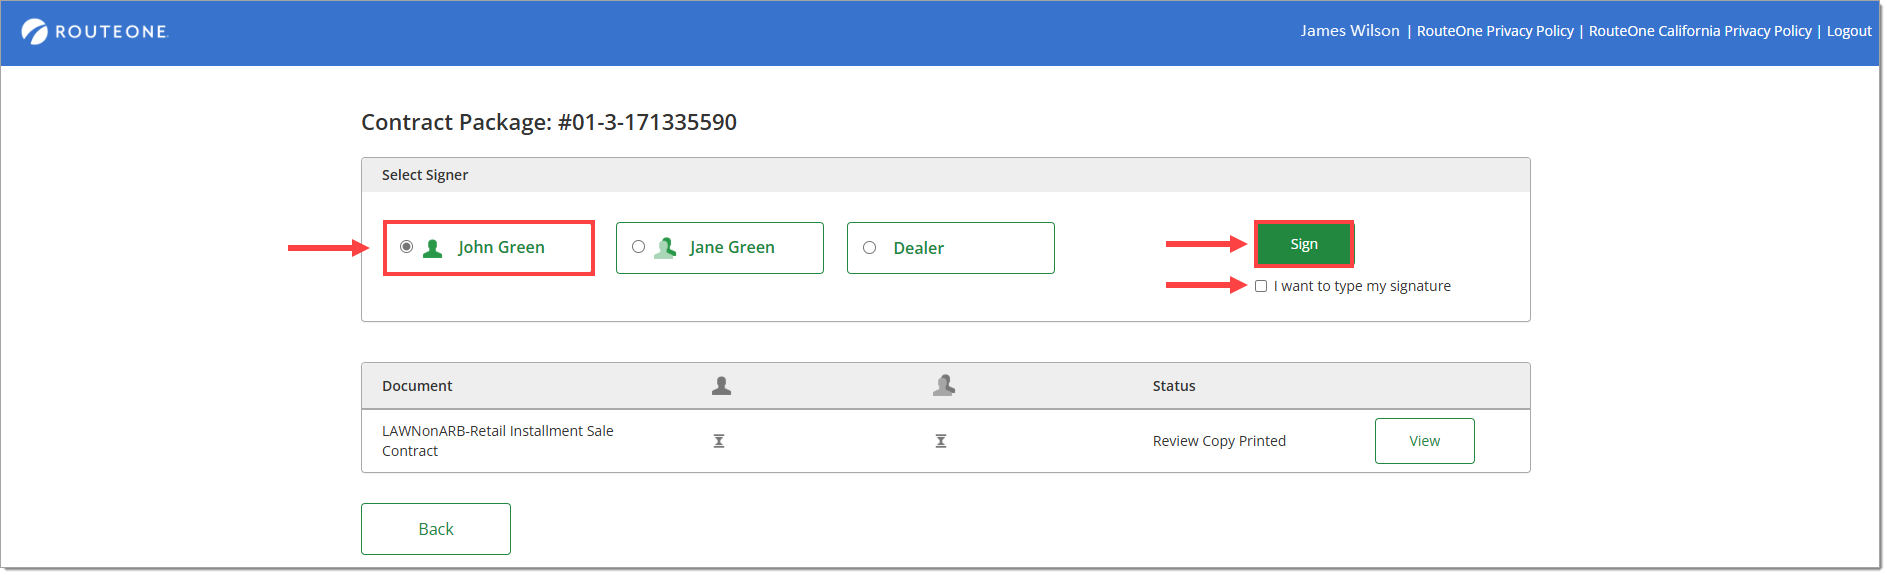
To begin the signing process, select a signer for the documents and click the ‘Sign’ button.
Selecting the ‘I want to type my signature’ checkbox will ensure that your customer(s) can type or draw their signatures during the eSign process, regardless of which signature capture method you have designated in Dealership Preferences.
You can repeat this process as needed to capture all signatures from each person in the ‘Select Signer’ list.
Signing Documents
As part of the ‘in-dealership signing experience,’ the customer will still have an opportunity to receive a physical review copy of the electronic contract package documents in advance of the eSigning experience as well as a completed copy after eSigning is completed.
The self-guided process will begin by capturing the signature for the current signer.
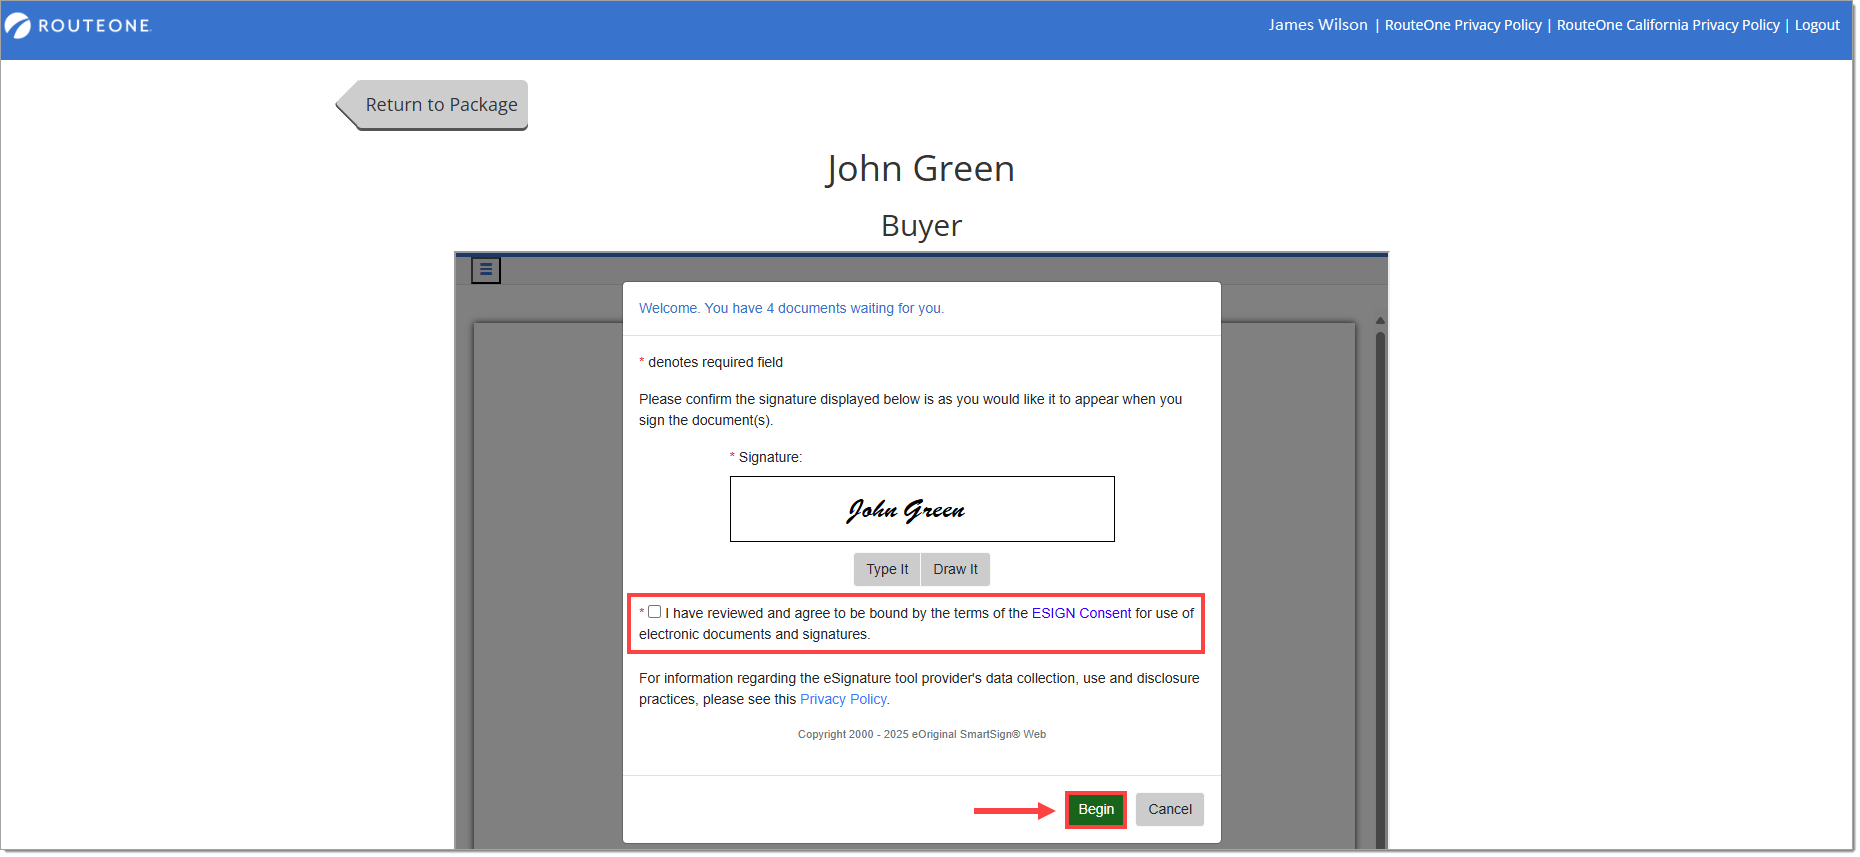
The current signer’s name and title is displayed at the top of the page for reference.
If needed, you can click ‘Return to Package’ to exit the signing process and return to the Contract Package page.
To begin the signing process, the signer will either type their signature or provide a drawn signature via mouse or a touchscreen device.
Depending on your dealership settings, the signer may have the option to select how they want their signature applied throughout the signing room; by using a typed or a drawn signature to sign the documents.
Your Dealership System Administrator (DSA) can select the types of signatures that are permitted when buyers sign in-store. If both signature types are permitted, note that a typed signature is the default setting. To learn more about setting your dealership’s ‘eSign Signature Types’ preferences, click here.
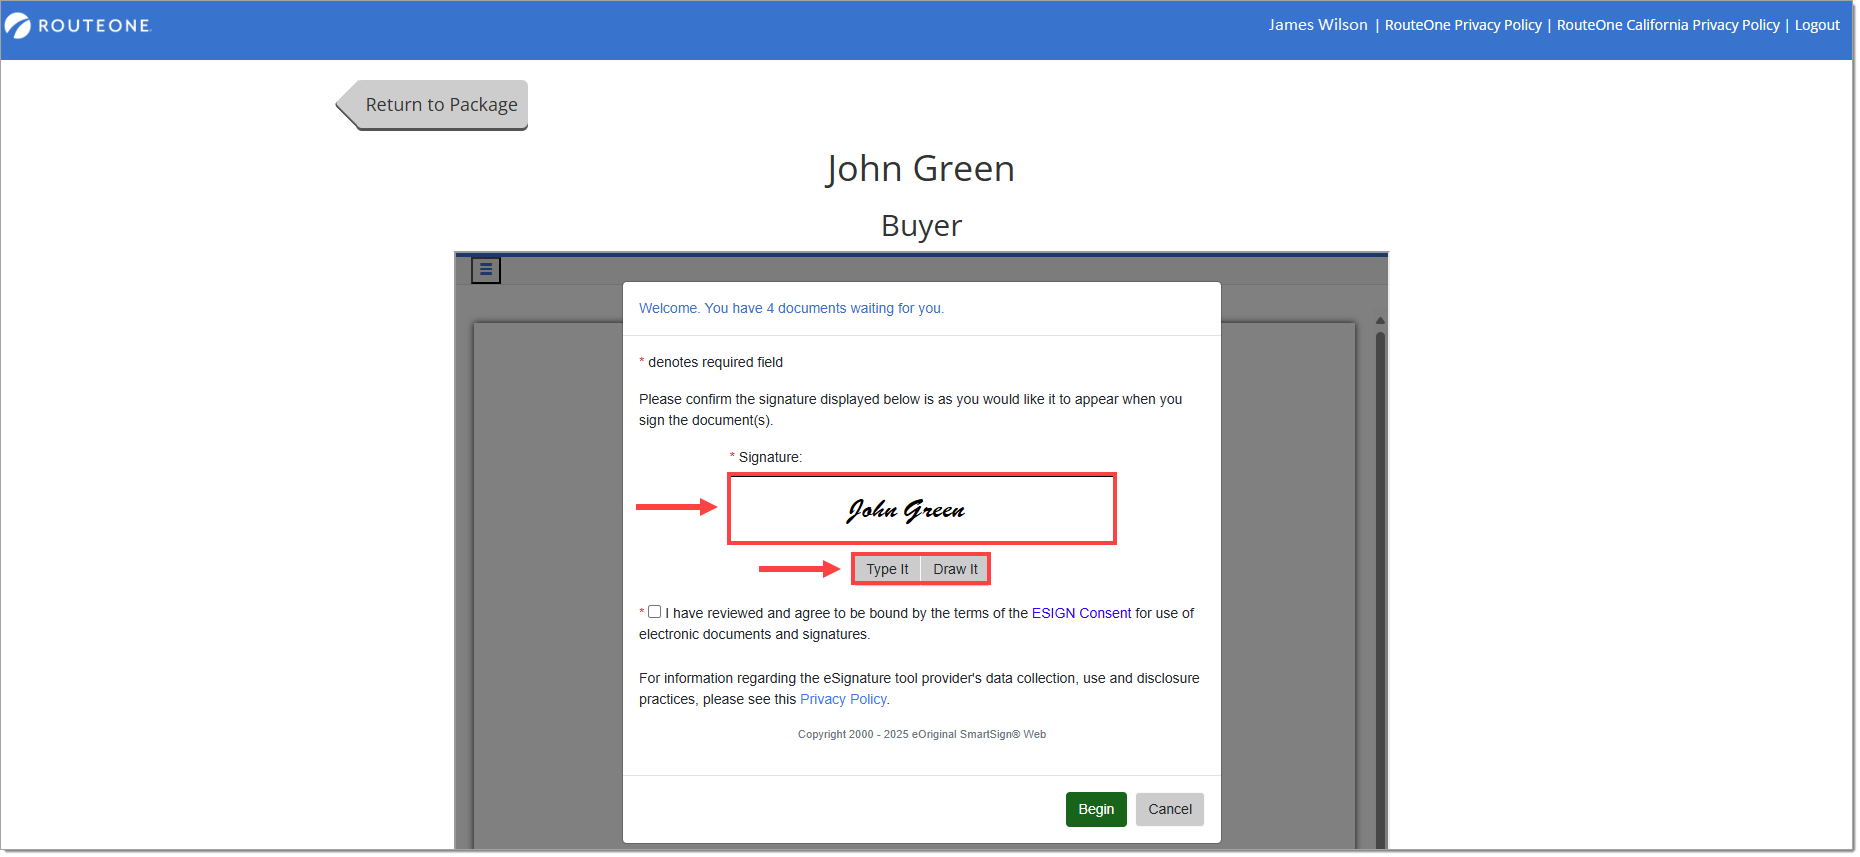
To continue, the signer must review the ESIGN Consent and select the checkbox to accept its terms.
Click the ‘Begin’ button to advance the signer to the signing room.
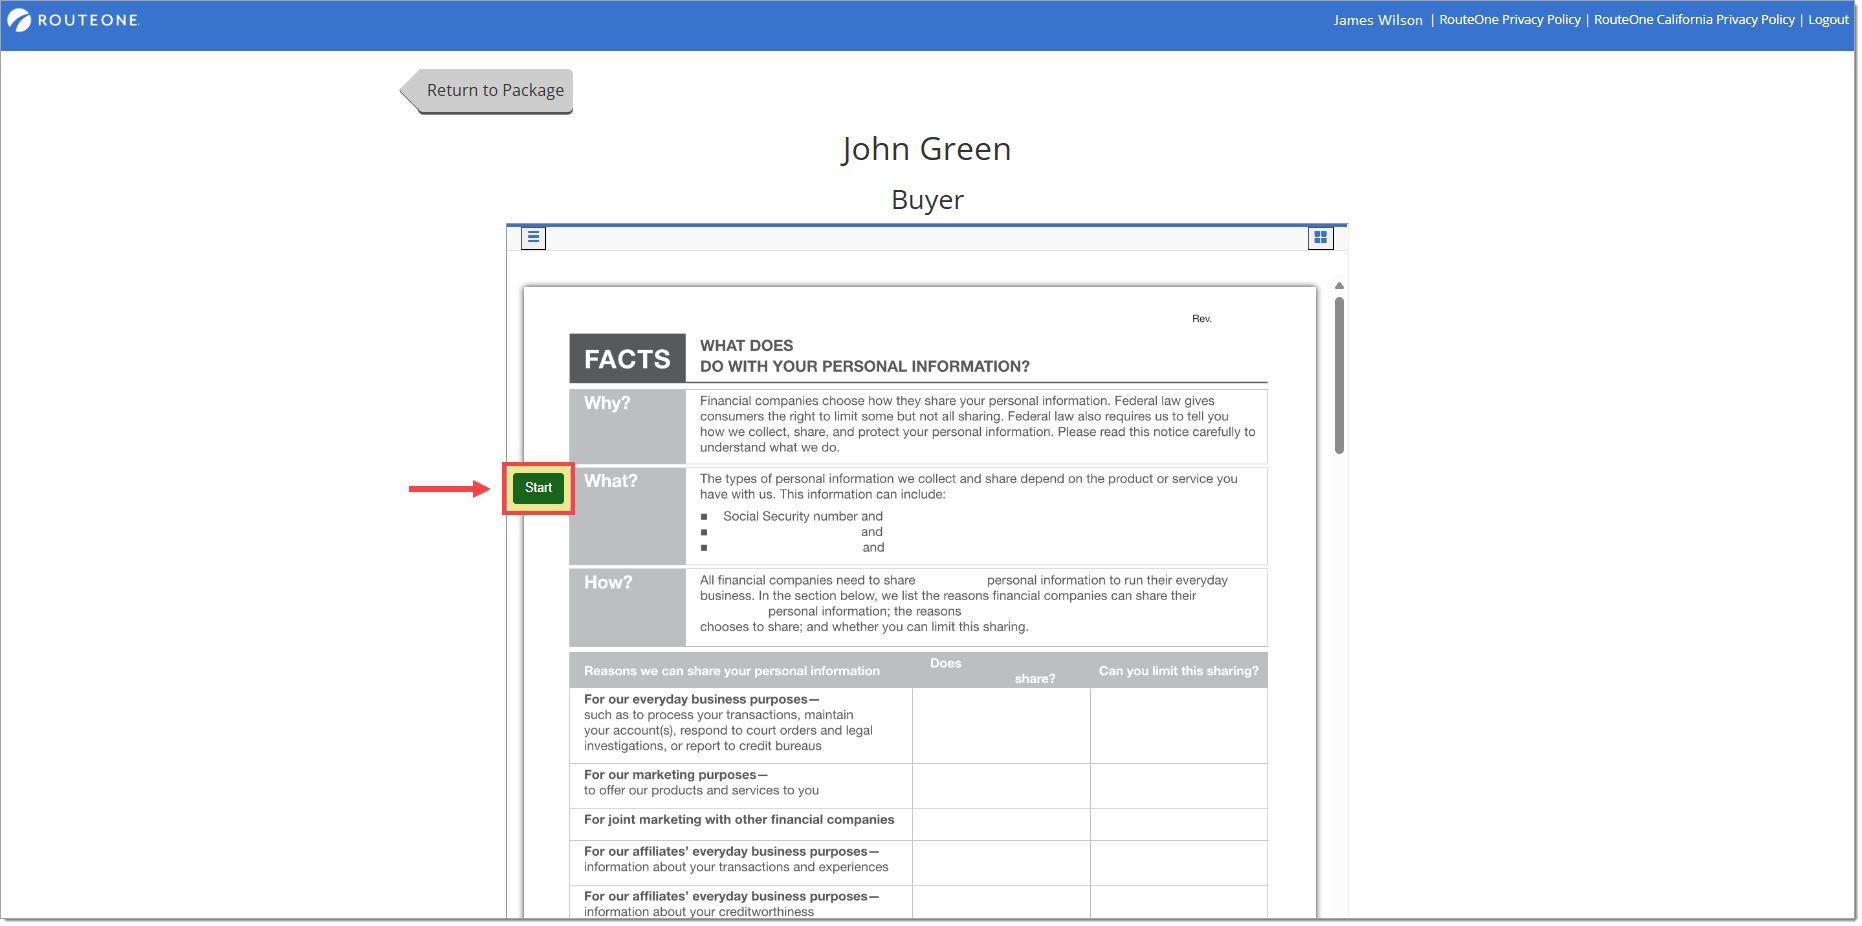
In the signing room, you can see the document that is currently being signed, and the current signer’s name and title is still displayed for reference.
Click the ‘Start’ button to advance the page to the first required signature line.
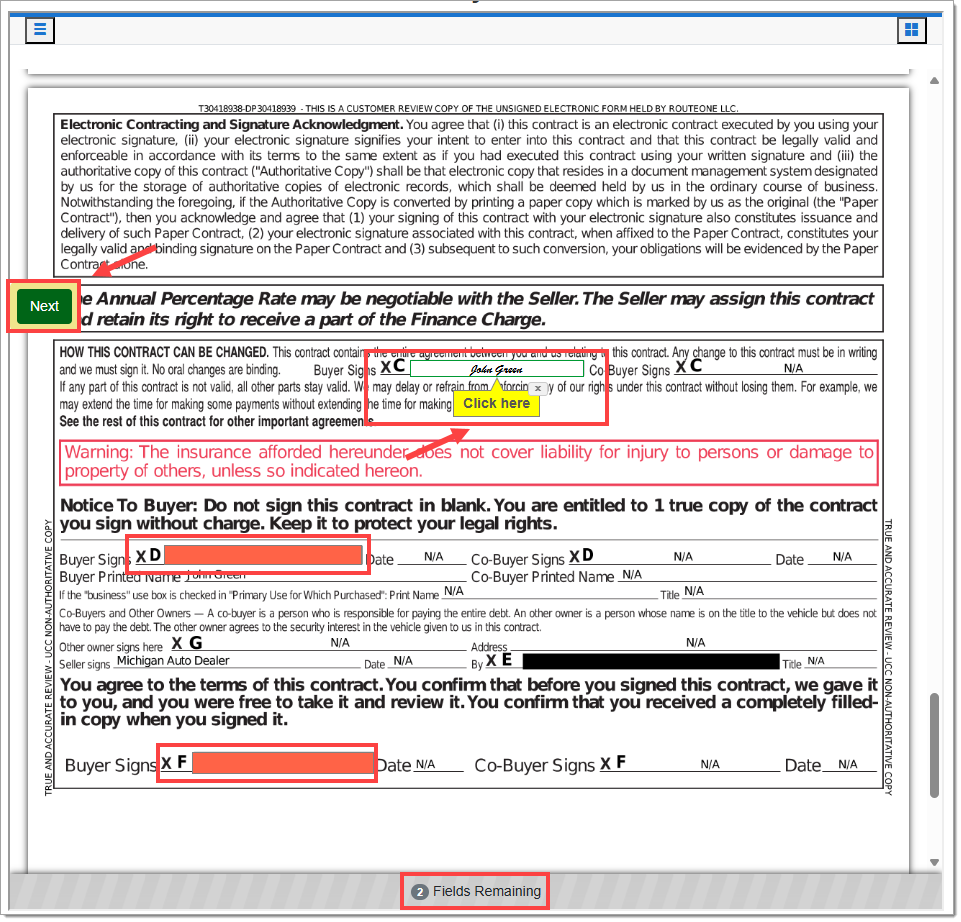
The signer will apply the signature by clicking on each area with a ‘Click here’ message.
Each eSigned signature will be highlighted with an ‘eSigned By’ box. This box will clearly display the signer’s information, along with a date and time stamp in Greenwich Mean Time (GMT).

The signer will click the ‘Next’ button to advance to the next required signature line, then proceed through all signature lines one-by-one. Required, unsigned fields will be highlighted, and the number of remaining fields to be signed is indicated at the bottom of the page.
Once a document has been signed, the system will proceed to the next document until the signer has completed signing all necessary documents.
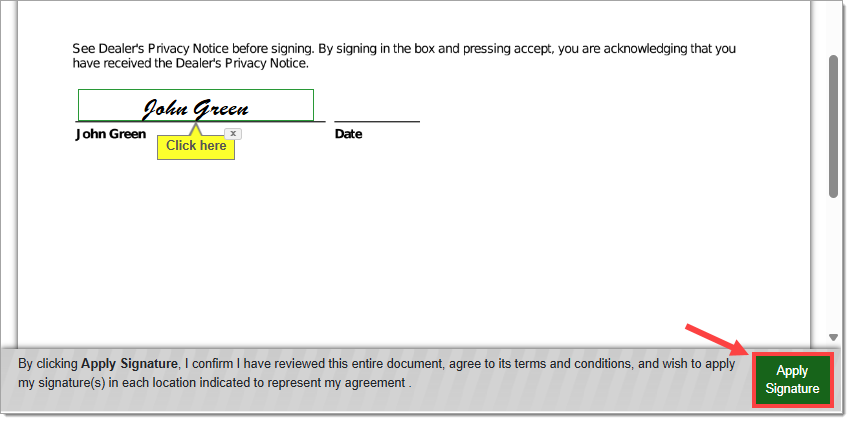
Once the customer has completed clicking all locations requiring a signature, the customer must then click ‘Apply Signature’ to confirm that they have reviewed the entire document, agree to its terms and conditions, and would like to apply their signature(s) in each location indicated to represent their agreement.
The signatures are then affixed to the electronic contract package documents.
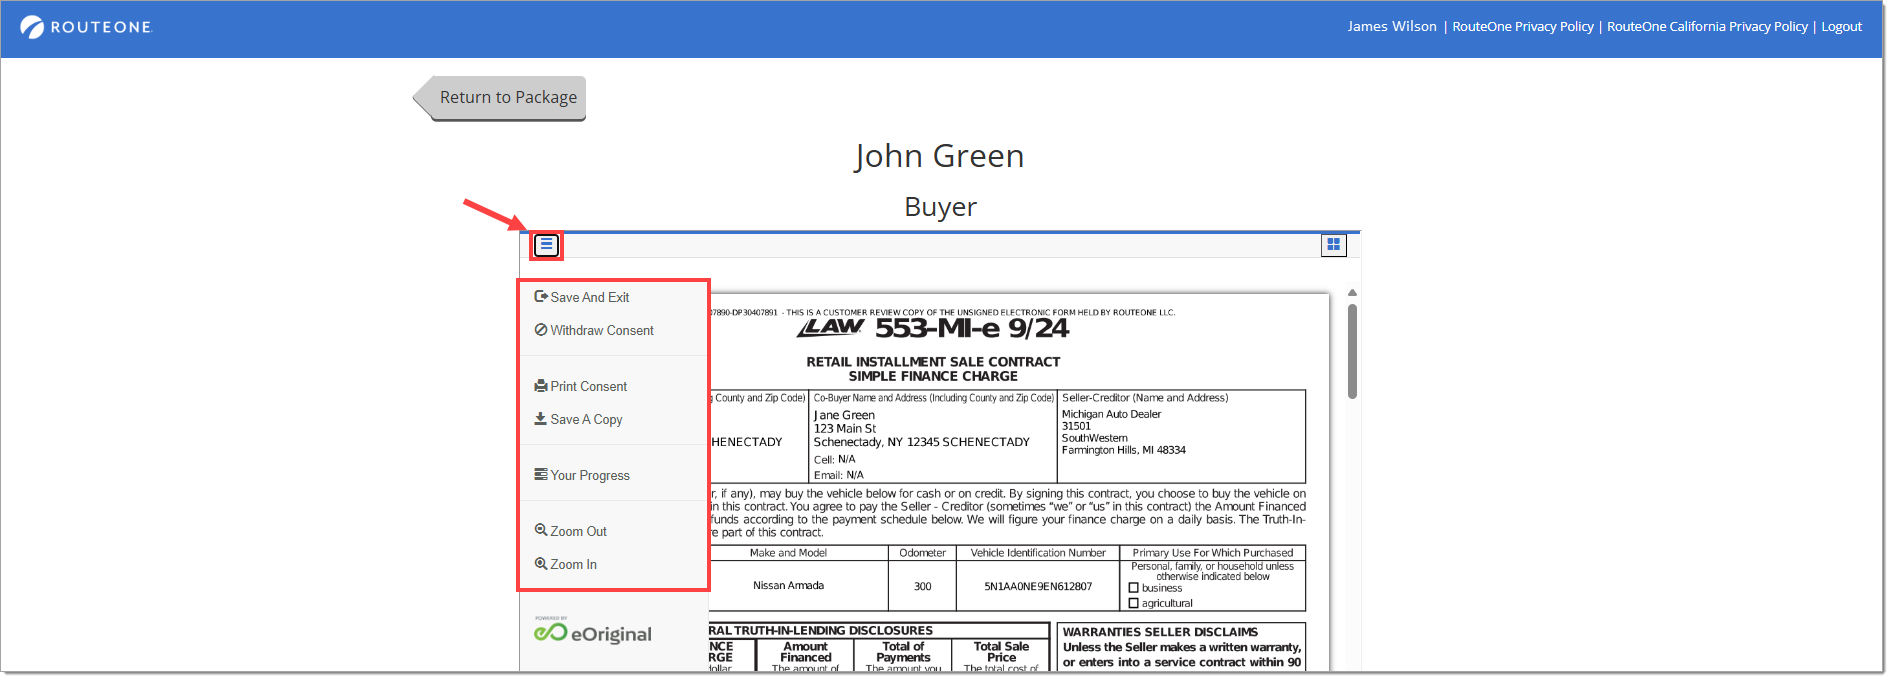
Navigating the Signing Room
There are actions that signers can take in the signing room in addition to signing the documents.
They can save and exit, withdraw consent, and view their signing progress from the left navigation pane.
Click the 'hamburger’ menu icon near the upper left-hand corner of the page to toggle to the available actions.
Since this is an in-dealership signing experience, selecting ‘Save A Copy’ opens the document in PDF form on a tablet.
Co-Buyer and Dealer Signatures
Co-Buyer
If the contract includes a co-buyer, select the radio button next to the co-buyer’s name on the ‘Contract Package’ page.
Co-buyers can also complete signature capture remotely, even if the buyer completed signature capture in-store. Click here to see the Remote eSigning User Guide for more information on this workflow.
Click the ‘Sign’ button again.
Regardless of whether they are signing remotely or in-store, the co-buyer will go through the same signing steps that the buyer went through.
Dealer
The dealer process for collecting signatures is similar to the Buyer and Co-Buyer. The steps include:
- On the ‘Contract Package’ page, select the radio button next to ‘Dealer.’
- Click the ‘Sign’ button.
- Click the required signature fields to apply signatures.
- Click the ‘Apply Signatures’ button to apply the signatures permanently to the document(s).
- Alternatively, the dealer can apply dealer signatures via the traditional signing method on the desktop. This involves accessing the RouteOne contract package page on your desktop and signing each signature line.
Viewing and Printing Documents
To view an individual document, click the ‘View’ button on the document in the ‘Contract Package.’ This will open a PDF copy of the selected document.
To print a document, click the printer icon within the opened PDF. This will prepare the document for printing and will then open the print dialog box on your device.

iPad and App Store are trademarks of Apple Inc., registered in the U.S. and other countries.
Android is a trademark of Google LLC.
ROUTEONE SUPPORT
Hours (EST)
Monday - Friday: 6:00am – Midnight
Saturday: 9am – 9pm
Can’t find what you need?
Try our search
