In This Guide:
Related Guides:
Compliance
Understanding the Credit & Compliance Page
The Credit & Compliance page is designed as a one-stop location for dealers to easily complete credit bureau and compliance activities.
Many compliance activities can be set to automatically run on every applicant. Have your Dealer System Administrator (DSA) review:
User Information and Permissions
Dealer Information and Preferences
- Top Section: For entering information and taking actions (completing new or updating additional activities)
- Lower Section: For reviewing results from previous activities.
Accessing the 'Credit and Compliance Page'
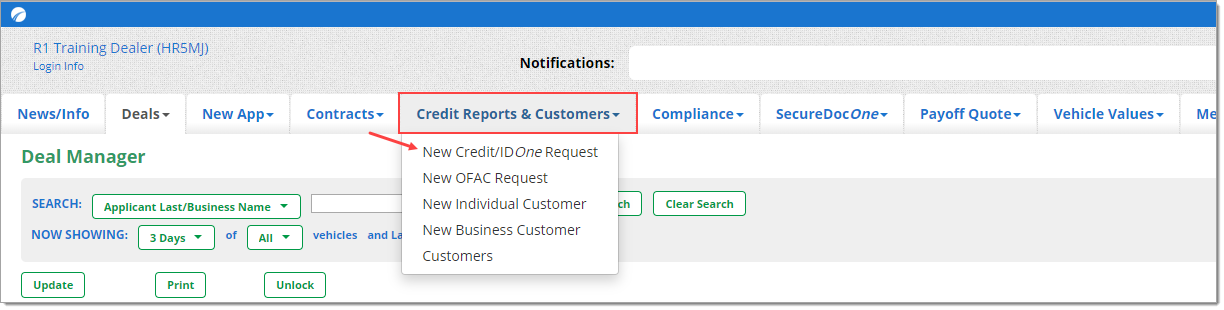
Click the ‘Credit Report & Customers’ tab in the top navigation, and select ‘New Credit/IDOne Request’ from the dropdown menu.
Create/Edit Customer Record
In the ‘Applicant’ screen, you can enter information for the customer. Required fields for pulling credit will be highlighted in yellow.
If you believe the customer already has a record inside the RouteOne system, click ‘Find Existing Customer’ to run a quick search in the ‘Customer Manager.’
- The ‘Customer Manager’ will display in a small pop-up window, and you will see two tabs. Select ‘Individuals’ or ‘Businesses’ depending on the type of customer record on which you are working.
- Begin typing the customer information into the ‘First,’ ‘Last,’ ‘Email,’ and ‘Phone’ fields. You will see that the results list will automatically filter based on the criteria entered, making it easy to match existing customers.
- If the customer appears in the list, simply click on that line item. You will be returned to the ‘Applicant’ screen, where their record will be populated.
- If the customer does not appear in the list, click the green ‘Go’ button. You will be returned to the ‘Applicant’ screen, where you can enter the customer information.
If the Social Security Number you enter on the ‘Applicant’ page matches a customer who already exists in the system, you will be offered the option to use the existing customer information.
If you click the ‘Yes’ button that appears under the Social Security Number message, the customer record load and you will automatically be navigated to the ‘Credit & Compliance’ page.
Once you have entered all relevant information for the Applicant (or if you selected an existing customer), you can either add a Co-Applicant or click the ‘Save’ button to navigate to the ‘Credit & Compliance’ page.
- To add a Co-Applicant, click the ‘Add Co-Applicant’ button at the bottom of the page, and follow the instructions below.
Adding A Co-Applicant
Once you have entered all relevant information for the Applicant, you can easily add a Co-Applicant by clicking the ‘Add Co-Applicant’ button at the bottom of the ‘Applicant’ page.
When the ‘Co-Applicant’ section appears, you can select the ‘Copy Applicant’s Info’ checkbox to copy the address and phone number for the Co-Applicant, if applicable.
You can also use ‘Find existing customer’ to also search for an existing Co-Applicant, if applicable.
Once you have entered all relevant information for the Co-Applicant, click the ‘Save’ button to navigate to the ‘Credit & Compliance’ page.
Page Functionality Tips
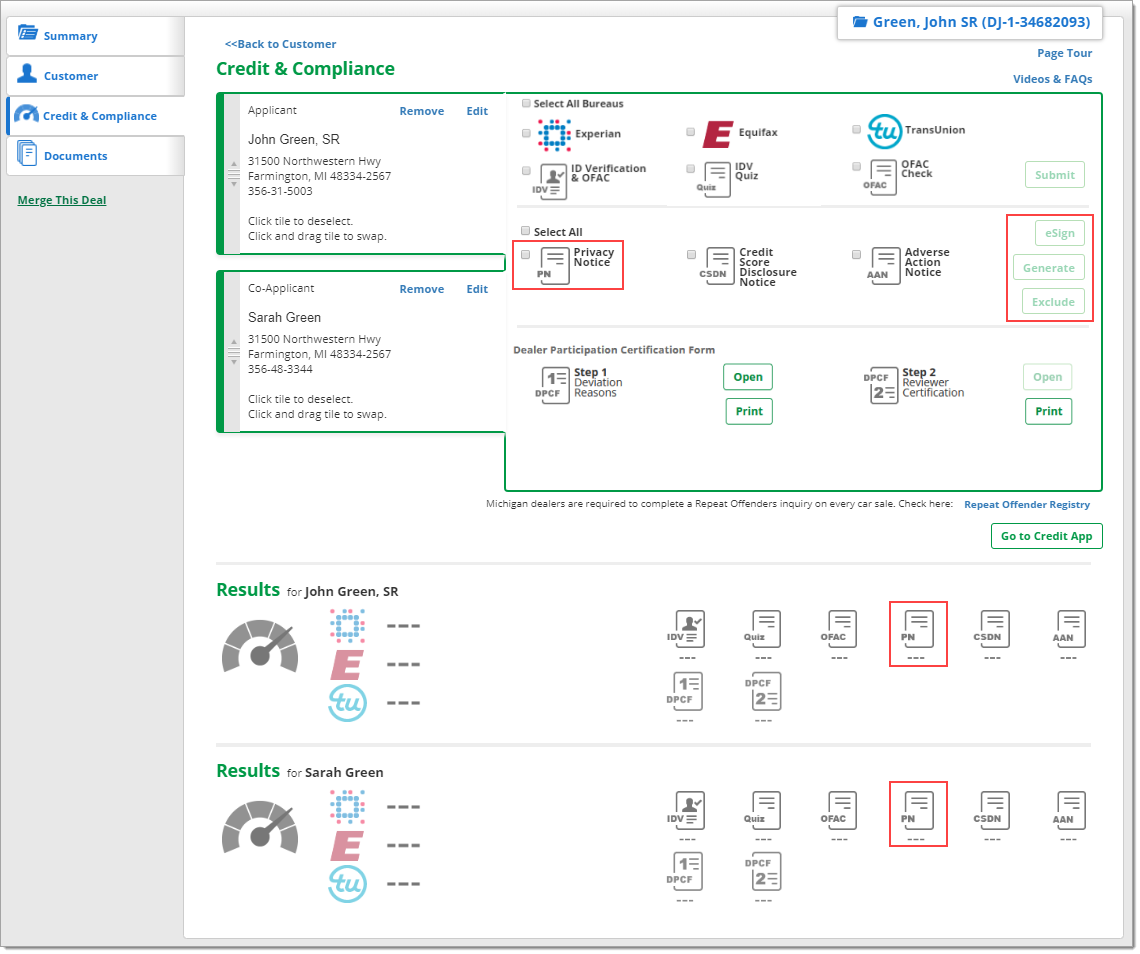
On the ‘Credit & Compliance’ page you will see the Applicant, and Co-Applicant (if applicable).
Customer information will appear on the left tile(s), and the compliance activities you can run appear on the right tile.
You can edit the Applicant or Co-Applicant information at anytime by clicking ‘Edit’ from the upper right corner of the customer tile(s).
You can also swap the Applicant and Co-Applicant on the ‘Credit & Compliance’ page. Click, drag, and drop their tiles.
You must click and drag from the grey vertical bar to the left of the customer information tile to activate the ability to swap the tiles.
If the credit application has been submitted and decisioned by a Finance Source, you will not be able to swap the applicant and co-applicant from the Credit & Compliance page. You need to navigate to the credit application to complete this function.
In order to open generated compliance documents, set your pop-up blocker to ‘Low,’ or completely turn your pop-blocker off within your browser. If you are using Chrome as your browser, set your pop-up blocker settings to the ‘Allow…’ option.

Important: Compliance activities will only be run on applicants who are enabled on the screen. Applicants who are enabled have a green vertical bar to the left of their customer information tile. By default, Applicants and Co-Applicants (if applicable) are automatically enabled.
To disable an applicant, simply click anywhere on their customer information tile, and the tile will appear greyed out.

Credit Report, ID Verification, OFAC, and IDV Quiz
Select which compliance activities you would like to run on your Applicant and/or Co-Applicant from the right tile.
Select one or more of the available reporting agencies that your dealership is subscribed to. Learn more about setting up credit bureaus.
If you are subscribed to RouteOne’s IDOne and identity verification tool, you can select the ‘ID Verification & OFAC’ option. An OFAC check will also automatically be run.
If the ID Verification result is ‘Caution’ or the OFAC result is ‘Fail’ you can generate an IDV Quiz to quiz customers on their identity.
If you are not subscribed to IDOne, you can still run a free OFAC check.
Alternatively, an IDV Quiz can be generated from the outset to help confirm customers’ identities if desired.
The IDV Quiz is a ‘risk-based authentication quiz’ that is paid on a transactional basis to your ID verification provider.
When you have made your selections, click the ‘Submit’ button to submit your selections for credit bureau(s), ‘ID Verification & OFAC,’ ‘IDV Quiz,’ and/or ‘OFAC Check.’
- More details on verifying identity with IDOne with 700 Credit
- More details on verifying identity with IDOne with NCC
- More details on verifying identity with IDOne with TransUnion
- More details on verifying identity with IDOne with Point Predictive
Reminder: Many compliance activities can be set to automatically run on every applicant. Have your Dealer System Administrator (DSA) review 'User Information and Permissions’ and ‘Dealer Information & Preferences’
Credit Report Results
When your report(s) are generated, results will display in the lower section of the page, in the ‘Results’ area.
If a report is taking an unusual amount of time to generate, the system will display an ‘In Progress’ icon and an ‘Update’ button. Clicking ‘Update’ will refresh the page (with a seven second delay).
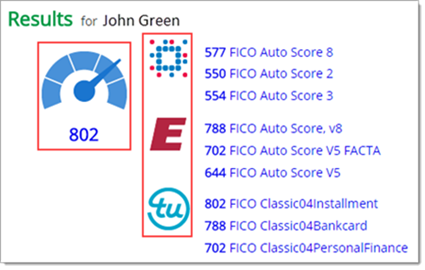
The speedometer, which was previously grey, will become blue when the report(s) are generated, and a score will be displayed blow. The score displayed will represent the highest score of all the credit reports requested.
To display all the credit reports, click on the speedometer icon to generate a pop-up window with all the generated reports.
Additionally, the credit reporting agency logos to the right of the speedometer icon, which were previously faded, will be displayed at full color. The corresponding credit scores and risk models will be displayed to the right.
- Multiple credit scores from each credit reporting agency are sorted from highest to lowest.
- If scores are identical for different risk models, then they will be sorted based on dealer preferences set for Risk Models, if any.
- To display a specific credit report, click on any of the individual credit reporting agency icons.
IDOne Results
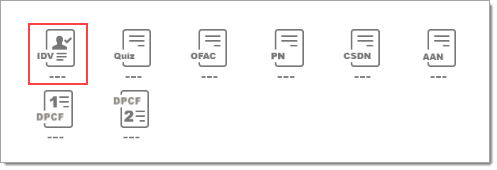
Identity verification results are displayed in the ‘Results’ section. This is located in the lower part of the page, on the right hand side, under the ‘IDV’ icon.
Identity verification results can have a status of either ‘Pass,’ ‘Fail,’ ‘In Progress,’ or ‘Caution.’ Click the icon to see the detailed ‘IDOne Results’ page.
If the status is ‘Caution,’ you can generate an ‘IDV Quiz’ by returning to the upper section of the page, selecting ‘IDV Quiz,’ and submitting it for the Applicant and/or Co-Applicant.
For more information on using IDOne refer to:
Verifying Identity With IDOne - 700 Credit
Verifying Identity With IDOne - NCC
Verifying Identity With IDOne - TransUnion®
Verifying Identity with IDOne - Point Predictive
Privacy Notice
Important: Before you can use the Privacy Notice functionality in the ‘Credit & Compliance page,’ your Dealer System Administrator (DSA) must upload your dealership’s Privacy Notice.
More information on settings and the Privacy Notice Form Builder
Begin by clicking on the ‘Admin’ tab from the top navigation of the RouteOne system and selecting ‘Preferences’ from the dropdown menu.
Scroll down to the ‘Privacy Notice’ section, and follow the instructions for uploading your dealership’s privacy notice. If you do not have a privacy notice that is custom to your dealership, you can easily and quickly create one with the Federal Reserve Board’s privacy notice builder, which is also accessible from the ‘Privacy Notice’ section in the ‘Preferences’ page.
Once you have an uploaded privacy notice you can enable eSigning by selecting the eSign checkbox in the ‘Privacy Notice’ section of the ‘Preferences’ page. This will allow you to have your customers to eSign a short document that acknowledges their receipt of your privacy notice.
To apply changes you’ve made to the ‘Preferences’ page, you must click the ‘Save Information’ button at the bottom of the page.
Once these settings are applied, you will be able to generate, print, and eSign your privacy notice from the ‘Credit & Compliance’ page.
On the ‘Credit & Compliance’ page, you can perform the following for your privacy notice:
Generate: Select the ‘Privacy Notice’ checkbox and click ‘Generate.’
- This will display your privacy notice in a popup window, which you can then print for the customer.
- Once the privacy notice is generated, the ‘Results’ section in the lower part of the ‘Credit & Compliance’ page will show a green check mark under the ‘PN’ icon.
Exclude: You can exclude your privacy notice by selecting the ‘Privacy Notice’ checkbox and clicking the ‘Exclude’ button.
- This will display a pop-up window that will allow you to document why you excluded the privacy notice (e.g. already gave the privacy notice to the customer). Then click the ‘Save & Exit’ button.
- Once saved, the ‘Results’ section in the lower part of the ‘Credit & Compliance’ page will show a green asterisk by the checkmark under the ‘PN’ icon.
- Clicking the icon will show the details entered about the exclusion.
eSign: Your customers can eSign your privacy notice. Begin by selecting the ‘Privacy Notice’ checkbox and clicking the ‘eSign’ button.
- The customer will be directed to apply their signature (via your method of collecting signatures: signature pad, tablet, etc.).
- After the customer eSigns, clicks ‘Accept,’ and then clicks ‘Apply Signature,’ a pop-up window with a PDF of the signed privacy notice will display.
- Once the signature has been applied to the privacy notice, the ‘Results’ section in the lower part of the ‘Credit & Compliance’ page will show a green pen icon under the ‘PN’ icon.
- Clicking the pen icon displays the pop-up window with a PDF of the signed privacy notice that can be printed.
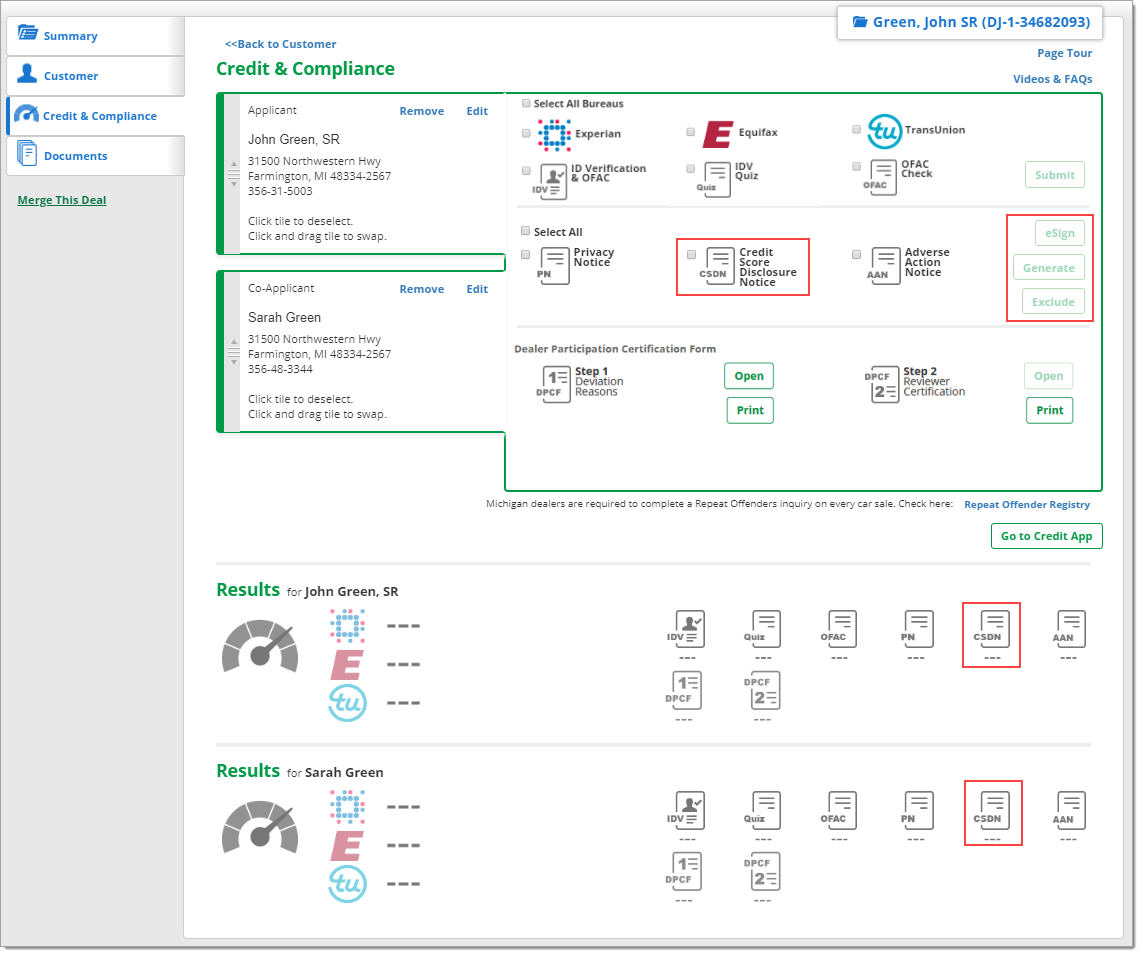
Credit Score Disclosure Notice
Credit Score Disclosure Notices (CSDN) can be set to automatically generate when a credit report is pulled.
This means that the CSDN checkbox would automatically be checked when you check any credit bureau checkbox. As soon as the credit report is generated, a window with the CSDN will pop up on the screen.
If you do not have those preferences set, have your Dealer System Administrator (DSA) review 'User Information and Permissions' and ‘Dealer Information & Preferences’.
Generate: Select the ‘Credit Score Disclosure Notice’ checkbox and click ‘Generate’ to manually generate the CSDN.
- This will display your CSDN in a popup window, which you can then print for the customer.
- Once the CSDN is generated, the ‘Results’ section in the lower part of the ‘Credit & Compliance’ page will show a green check mark under the ‘CSDN’ icon.
Exclude: You can exclude a CSDN by selecting the ‘Credit Score Disclosure Notice’ checkbox and clicking the ‘Exclude’ button.
- This will display a pop-up window that will allow you to document the reason you excluded the CSDN (e.g. printed from another system and already gave to the customer). Then click the ‘Save & Exit’ button.
- Once saved, the ‘Results’ section in the lower part of the ‘Credit & Compliance’ page will show a green asterisk by the checkmark under the ‘CSDN’ icon.
- Clicking the icon will show the details entered about the exclusion.
eSign: Your customers can eSign the CSDN.
- You can begin the signing process for the customer by selecting the ‘Credit Score Disclosure Notice’ checkbox and clicking the ‘eSign’ button.
- The customer will be directed to apply their signature (via your method of collecting signatures: signature pad, tablet, etc.).
- After the customer eSigns, clicks ‘Accept,’ and clicks ‘Apply Signature,’ a pop-up window with a PDF of the signed CSDN will display.
- Once the signature has been applied to the CSDN, the ‘Results’ section in the lower part of the ‘Credit & Compliance’ page will show a green pen icon under the ‘CSDN’ icon.
- Clicking the pen icon displays the pop-up window with a PDF of the signed CSDN that can be printed.
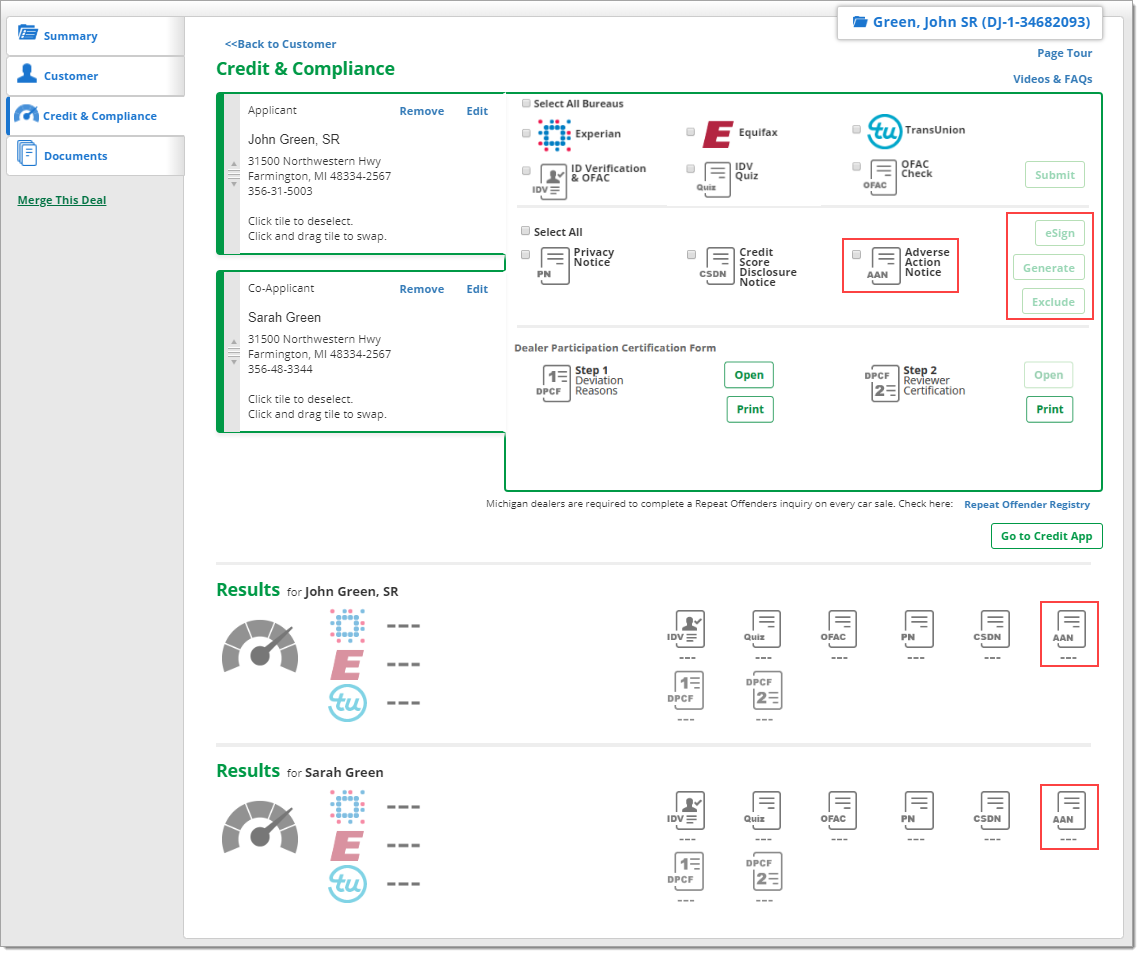
Adverse Action Notice
You can generate an Adverse Action Notice (AAN) regardless of whether or not a credit report has been pulled.
The system will respect Dealer Preferences for a Preferred Risk Model, if set. If not, the system will use the first credit score and Risk Model listed in the credit report.
If the auto-generate option is set up in your ‘Preferences’ page, AANs will be automatically be generated when credit bureau reports are pulled (similar to CSDN). This means that the AAN checkbox will automatically be checked when you check any credit report box. As soon as the credit report generates, a window with the AAN will pop up on the screen.
Generate: Select the ‘Adverse Action Notice’ checkbox and click ‘Generate’ to manually generate the AAN.
- This will display a PDF of the AAN in a pop-up window, which you can then print for the customer.
- Once the AAN is generated, the ‘Results’ section in the lower part of the ‘Credit & Compliance’ page will show a green check mark under the ‘AAN’ icon.
Exclude: You can exclude an AAN by selecting the ‘AAN’ checkbox and clicking the ‘Exclude’ button.
- This will display a pop-up window that will allow you to document the reason you excluded the AAN (e.g. handed to the customer in person). Then click the ‘Save & Exit’ button.
- Once saved, the ‘Results’ section in the lower part of the ‘Credit & Compliance’ page will show a green asterisk by the checkmark under the ‘AAN’ icon.
- Clicking the icon will show the details entered about the exclusion.
More information on 'Subscribing - Adverse Action Notice Mailing Services'
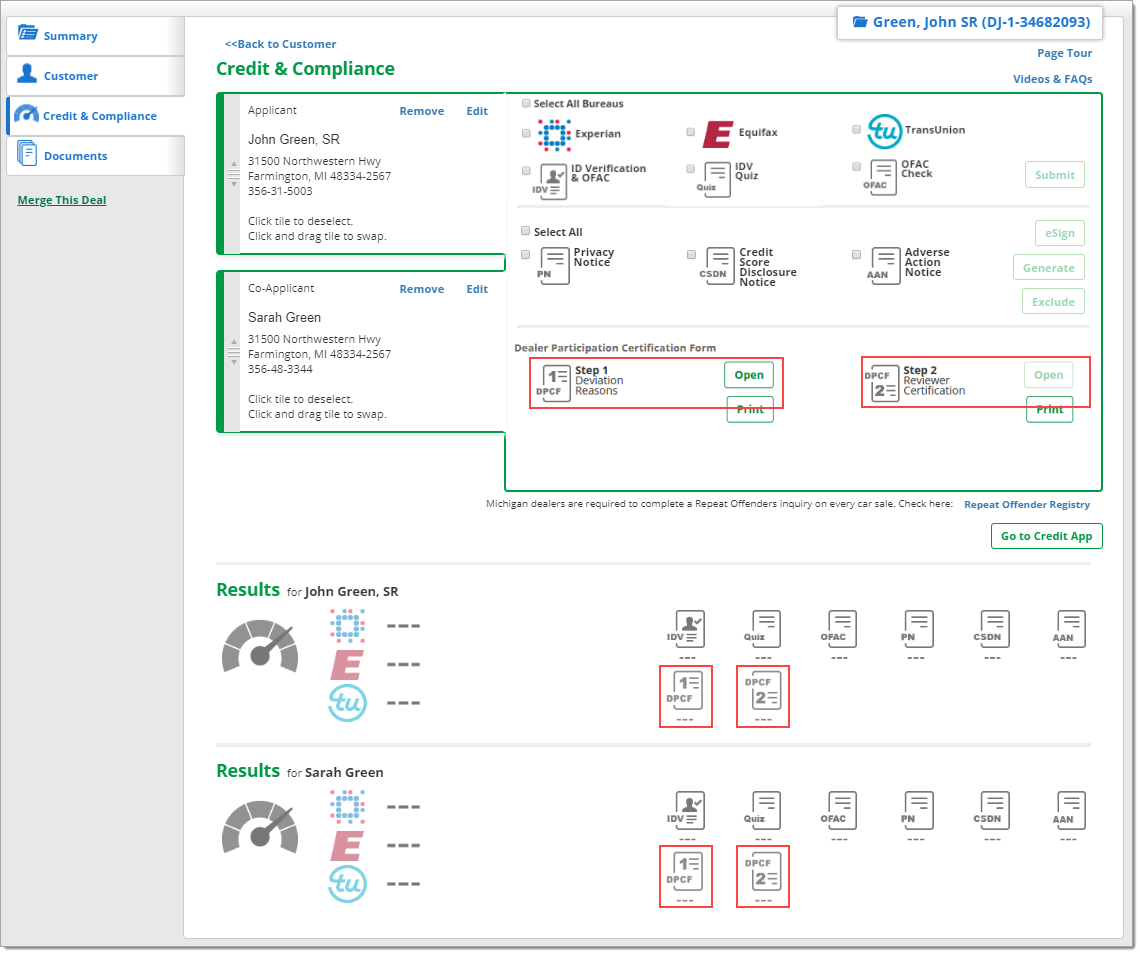
Dealer Participation Certification Form
You can open and create Dealer Participation Certification Forms (DPCF) for all Retail and Balloon credit applications that are decisioned or funded.
If the transaction type is not Retail or Balloon, or if the credit application isn’t decisioned or funded, the ‘Open’ and ‘Print’ buttons will be greyed out.
To begin, click the ‘Open’ button next to the DPCF ‘Step 1 Deviation Reasons’ icon. Complete the form and click ‘Complete & Print.’
A window will pop up with a printable PDF of the DPCF. If you need to relaunch the printable PDF, click the ‘Print’ button next to the DPCF ‘Step 1 Deviation Reasons.’
The ‘Results’ section in the lower part of the ‘Credit & Compliance’ page will show a green checkmark under the ‘1 DPCF’ icon.
Instructions for the ‘Step 2 Reviewer’
Important: The top section must be completed by a different user, as mandated by the NADA Fair Credit Compliance program. The second user must have ‘Dealer Participation Certification Form Reviewer’ permissions.
In the top section of the ‘Credit & Compliance’ page, the DPCF ‘Step 2 Reviewer Certification’ icon will now be available.
To find the customer, begin by clicking on the ‘Credit Reports & Customers’ tab in the top navigation and selecting ‘Customers’ from the dropdown menu.
- Search for the customer and select from the results in the list.
- You will be navigated to the ‘Customer’ record. In the ‘Deal History’ section, click ‘Review’ under the ‘Credit & Compliance’ column. You will be navigated to the ‘Credit & Compliance’ page.
Click the ‘Open’ button next to the DPCF ‘Step 2 Reviewer Certification’ icon to complete the ‘Step 2’ review of the DPCF.
- If the exception rate is correct, check the box to ‘Certify that the Final Dealer Participation Rate complies with the Dealer Fair Credit Compliance Program at [Dealership Name].’
- If the rate is incorrect, click ‘Certify that I have initiated the corrective action noted below,’ fill in the correct dealer rate exception, and make note of the corrective action taken.
Once the ‘Step 2’ review is complete, the ‘Results’ section in the lower part of the ‘Credit & Compliance’ page will show a green checkmark under the ‘2 DPCF’ icon.
Once your compliance activities have been completed and verified, proceed to the credit application by clicking the ‘Go to Credit App’ button at the bottom of the ‘Credit & Compliance’ page.
ROUTEONE SUPPORT
Hours (EST)
Monday - Friday: 6:00am – Midnight
Saturday: 9am – 9pm
Can’t find what you need?
Try our search
